Page 8
CDBC-APS/TS/TSR ADJUSTMENTS & OPTIONAL SETTINGS
Setting Brew Temperature
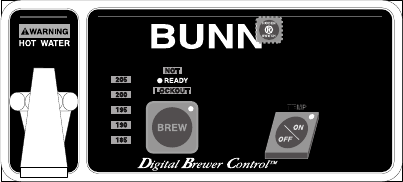
The brewer is factory set to brew at 200°F(95°C). To change this setting, press and hold the "HIDDEN" switch
beneath the "®". The word "TEMP" above the "ON/OFF" switch will glow to correspond with the temporary function
change of this switch. Repeatedly press and release the "ON/OFF" switch until one of the bank of temperature
indicators shows the approximate desired temperature. When two indicators are glowing, the temperature is
approximately the number between them.
Displaying Brew Temperature
The brewer is factory set with the temperature display disabled. To change this setting, press and hold the "ON/
OFF" switch and the "HIDDEN" switch beneath the "®" for five seconds, the entire bank of temperature indicators
will glow. Release both switches. Pressing and releasing the "ON/OFF" switch will toggle between turning the entire
bank of temperature indicators on-or-off, signifying the "ON" or "OFF" condition of this display. Wait for a few
seconds, the brewer will maintain this last setting.
Setting Brew Lockout
The brewer is factory set with the brew lockout disabled. Brew lockout prevents starting a brew cycle if the ready
indicator is not glowing. When an attempt at brewing cannot be allowed, the word "NOT" and "LOCKOUT" flash for
three seconds to indicate the reason the brew can't begin. To change the condition of the brew lockout, press and
hold the "HIDDEN" switch beneath the "®" and momentarily press the "BREW" switch.
IMPORTANT: The tank must be full and fill solenoid shut off prior to making these adjustments.
Adjusting Brew Volumes
The brewer is factory set to deliver 64 ounces ± 2 for each brew cycle.
BREW VOLUME SET-UP: Use the following steps when the setting is unknown or a different circuit board is being
installed.
1. Place an empty funnel in the funnel rails and an empty server or graduated vessel beneath the funnel.
2. Place the "ON/OFF" switch in the "ON", upper position.
3. Press and hold the brew start button until you hear the brew solenoid click on-and-off three times
(approximately 5 seconds). Release the button.
4. Allow the cycle to continue until the desired amount of water is dispensed and then turn "OFF" the brewer.
The brewer is now set to dispense this amount of water for each subsequent brew cycle.
To increase the amount of water for each brew cycle place an empty funnel in the funnel rails and an empty
server or graduated vessel beneath the funnel. Press the "ON/OFF" switch. Press and hold the "BREW" switch until
you hear the solenoid click on-and-off three times (approximately 5 seconds), then release the "BREW" switch.
Momentarily press and release the "BREW" switch once for each ounce (approximate) of water to be added to the
prior setting and allow the brew cycle to finish.
To decrease the amount of water for each brew cycle place an empty funnel in the funnel rails and an empty
server or graduated vessel beneath the funnel. Press the "ON/OFF" switch. Momentarily press and release the
"BREW" switch once for each ounce (approximate) of water to be removed from the existing setting. Press and
hold the "BREW" switch until you hear the solenoid click on-and-off three times (approximately 5 seconds), then
release the "BREW" switch and allow the cycle to finish.
P1912
29253 030101


