


BUNN Espress™
ES•2A™/ES•2SA™
8
START-UP
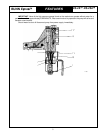
Retighten the tank cover bolts, nuts, flat section strips, tank heaters, and the individual tank section lids
(at upper part of the tank). Fill the tank with water to the optimum water level zone (N) using the water feed
tap. In the models with and electronic water level control fill the tank to the minimum water level zone (-).
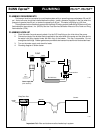
Connect the electrical system.
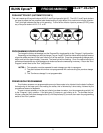
Turn on the toggle switch located on the base (left side bottom). The indicator lamp on the front of the
base (left side) will light up. When the toggle switch is turned on, in the model with an electronic water level
control, the electronic water level operation pilot light will light up, start the pump set and open the water inlet
valve (located inside the machine) introducing water into the tank until it reaches the optimum water level zone
(N).
NOTE: During the initial fill of the tank, if manual fill is not used and automatic is filling the tank,
the alarm condition will arise (during re-fill no water goes through the flowmeter). Refer to
“DOSAGE PULSEMETER MALFUNCTION ALARM” in the TROUBLE SHOOTING section
in this manual for further instruction.
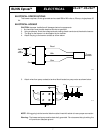
When the water makes contact with the sensor probe, this will close the inlet valve, shut off the pump set,
and disconnect the pilot light.
While waiting for the machine to reach working pressure (tank pressure gauge), check and adjust the
pump set as on page 4.
When the tank and the pump pipes are filled, press the “continuous doses” push button on each set and
the pumping unit will immediately start injecting water into the corresponding tank section and tube leading
to the units until water begins to flow through them. This indicates that air has been bled from the hydraulic
circuit and the push-buttons can be pressed again to shut off the pump.
Before the tank pressure reaches 1.2 bar, air must be bled from inside the tank as described on page 4.
When the tank pressure gauge indicates 1.2 bar, the electrical pressure switch will disconnect. If this does
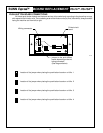
not occur at the mentioned pressure, adjust the pressure switch (page 29 figure 1), placed inside the machine
on the right side, using the inside adjustment screw. Tightening the screws lowers the tripping pressure and
vice-versa.
When the water in the individual tank sections and hydraulic circuit expands do to heating, the water
pressure gauge reading will exceed 8-9 bar working pressure, and when the pressure reaches 11 bar the
pressure release valve will open to release said pressure. If not, the inside nut (page 19 figure 13) must be
adjusted so that it discharges the pressure at an indicated pressure of 11 bar.
Place a dose of ground coffee (approx. 6 grams) in the cup of the filter-holder and after lightly tamping
the coffee, and wiping the rim free of any excess grounds, place the filter holder in the group head unit.
Turn on the push button control (red button) and all the mechanisms of the unit will begin operating, Let
it run about 30 seconds and observe the pump feed pressure.
INITIAL SETUP