


,
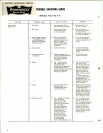
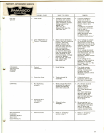
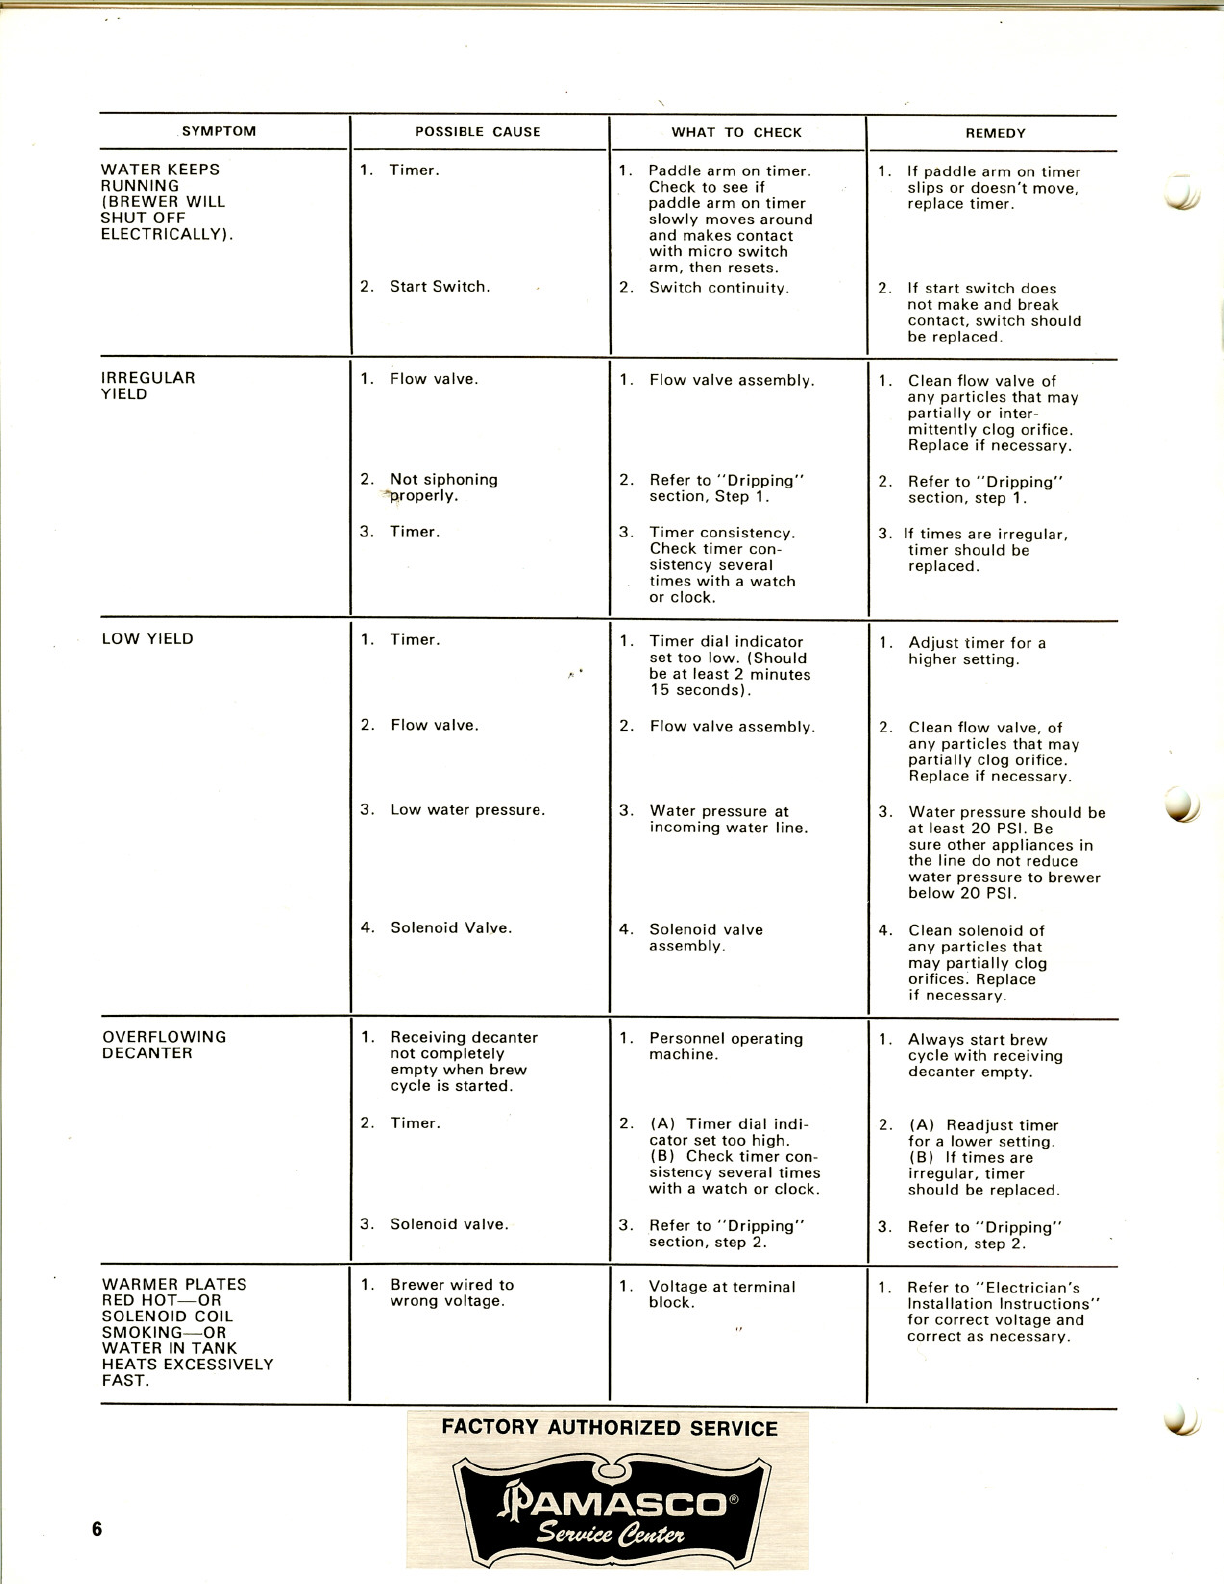
SYMPTOM
POSSIBLE CAUSE
WHAT TO CHECKREMEDY
WATER KEEPS
1.
Timer.
1.
Paddle arm on timer.
1.
If paddle arm on timer
RUNNING
Check to see if
slips or doesn't move,
(BREWER WILL
paddle arm on timer
replace timer.
SHUT OFF
slowly moves around
ELECTRICALLY).
and makes contact
with micro switch
arm, then resets.
2.
Start Switch.
2.
Switch continuity.
2.If start switch does
not make and breakcontact, switch should
be replaced.
IRREGULAR
1.
Flow valve.
1.
Flow valve assembly.
1.
Clean flow valve of
YIELD
any particles that may
partially or inter-
mittently clog orifice.Replace if necessary.
2.
Not siphoning
2.
Refer to "Dripping"
2.
Refer to "Dripping"
'"properly.
section, Step 1.
section, step 1.
3.
Timer.
3.
Timer consistency.
3. If times are irregular,
Check timer con-
timer should be
sistency several
replaced.
times with a watch
or clock.
LOW YIELD
1.
Timer.
1.
Timer dial indicator
1.
Adjust timer for a
set too low. (Should
higher setting.
.-
be at least 2 minutes
15 seconds).
2.
Flow valve.
2.
Flow valve assembly.
2.Clean flow valve, of
any particles that maypartially clog orifice.Replace if necessary.
3.
Low water pressure.
3.
Water pressure at
3.
Water pressure should be
incoming water line.
at least 20 PSI. Be
sure other appliances in
the line do not reduce
water pressure to brewer
below 20 PSI.
4.
Solenoid Valve.
4.
Solenoid valve
4.
Clean solenoid of
assembly.
any particles that
may partially clogorifices: Replace
if necessary.
OVERFLOWING
DECANTER
WARMER PLATES
RED HOT-OR
SOLENOID COIL
SMOKING-OR
WATER IN TANK
HEATS EXCESSIVELY
FAST.
1. Receiving decanter
not completely
empty when brew
cycle is started.
2. Timer.
3. Solenoid valve.
1. Brewer wired to
wrong voltage.
1.
Personnel operating
11.
Always start brew
machine.
cycle with receiving
decanter empty.
2.
(A) Timer dial indi-
2.
(A)
Readjust timer
cator set too high.
for a lower setting.
(B) Check timer con-
(B)
If times are
sistency several times
irregular, timer
with a watch or clock.
should be replaced.
3.
Refer to "Dripping"
3.
Refer to "Dripping"
section, step 2.
section, step 2.
1.
Voltage at terminal
11.
Refer to "Electrician's
block.
Installation Instructions"
for correct voltage andcorrect as necessary.
6
FACTORY AUTHORIZED SERVICE