


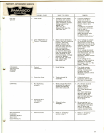


COMPONENT' REPLACEMENT INSTRUCTIONS
CAUTION: DISCONNECT COFFEE BREWER FROM POWER SOURCE PRIOR TO REMOVING ANY COM.
PONENTS.
Access to electrical components is gained by removing front access panel.
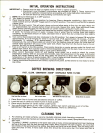
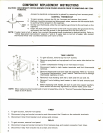
CONTROL THERMOSTAT
1. To gain access, remove top lid via 4 screws and remove front panel.
2. Remove mounting screws and disconnect wires, remove old thermostat bulb
by pulling firmly upward on the capillary.
TANK 3. On the new thermostat, slide the red capillary grommet to the red mark on the
LID capillary.
4. Insert the bulb through the hole in the tank lid and press the grommet firmly
and evenly so that the groove in the grommet fits into the tank lid.
NOTE: If water tank is full of water, turn control thermostat knob clockwise to desired setting. Refer to
"Initial Operation Instructions" steps 6, 7 and 8. If water tank is not full of water, turn control
thermostat knob fully counterclockwise until tank is filled.
NOTE:
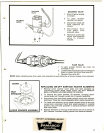
TANK HEATER
1. To gain acicess, remove top lid via 4 screws.
2. Remove sprayhead and sprayhead nut from water tube below the
hood.
3. Loosen compression fitting on air vent tube in hood.
4. Disconnect leads to tank heater terminals and limit thermostat
terminal.
5. Remove thermostat bulb from tank lid assembly. Refer to "Control
Thermostat Replacement" step 2 above. Take care not to damage
thermostat capillary or bulb.
6. Remove 8 nuts holding tank lid to tank and lift out tank lid.
7. Remove 2 nuts holding tank heater to tank lid and remove tank
heater.
8. When replacing tank heater, be sure to use new copper washers.
Nuts should be securely tightened to assure water proof seal.
When replacing thermostat bulb in tank lid assembly, refer to "Control Thermostat Replacement"
steps 3 and 4 above.
TIMER
1. To gain access, remove front panel.
2. Disconnect plug and socket connector and disconnect the 2 leads on the solenoid terminals.
3. Disconnect timer from bracket via 2 screws and remove.
RELAY
1. To gain access, remove front panel.
2. Disconnect plug and socket connector from harness plug and socket connector from timer.
3. Disconnect relay from bracket via 2 screws and remove.
8