


3
00656.0000
12368.0001
00831.0000
INITIAL SET-UP
1. Locate the drip tray assembly beneath the dispenser nested in the packing material.
2. Remove the cup locator plate from the drip tray and the drip tray cover and set them aside.
3. Remove the water strainer assembly from the drip tray and set it aside.
4. Remove the four legs from the drip tray and securely install them in the dispenser base.
ELECTRICAL REQUIREMENTS
CAUTION - The dispenser must be disconnected from the power source until specified in
Initial Set-Up.
The 120 volt version of this dispenser has an attached cordset and requires 2-wire, grounded service rated 120
volts ac, 20 amp, single phase, 60 Hz. The mating connector must be a NEMA 5-20R.
The 120/208 or 120/240 volt version of this dispenser requires 3-wire, grounded service rated 120/208 or 120/
240 volt ac, 20 amp, single phase, 60 Hz.
(
Refer to the dispenser’s dataplate for exact voltage requirement.)
ELECTRICAL HOOK-UP
CAUTION – Improper electrical installation will damage electronic components.
1. An electrician must provide electrical service as specified.
2. Using a voltmeter, check the voltage and color coding of each conductor at the electrical source.
3. Open the front door of the dispenser and place the heater switch in the “OFF” (upper position).
120 volt versions skip to step 6.
120/208 or 120/240 volt versions proceed to next step.
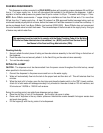
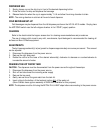
4. Remove the right side panel of the dispenser.5. Install the electrical wiring to
the terminal block as illustrated at right.
6. Connect the dispenser to the power source and verify the voltage at the terminal
block. Reinstall the side panel.
7. If plumbing is to be hooked-up later be sure the dispenser is disconnected from
the power source. If Plumbing has been hooked-up, the dispenser is ready for
Initial Set-Up
.
120V.A.C.
120V.A.C.
208 or
240V.A.C.
L2 RED
L1 BLACK
NEUTRAL
WHITE
26530 060500