


Page 5
27040 111808
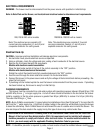
venter and dispenser. Installing the shock arrestor as close to dispenser as possible will provide best results.
1. Flush the water line and securely attach it to the flare fitting on the strainer/flow control located on bottom
of brewer.
2. Turn on the water supply.
CE REQUIREMENTS
• This appliance must be installed in locations where it can be overseen by trained personnel.
• For proper operation, this appliance must be installed where the temperature is between 5°C to 35°C.
• Appliance shall not be tilted more than 10° for safe operation.
• An electrician must provide electrical service as specied in conformance with all local and national codes.
• This appliance must not be cleaned by water jet.
• This appliance is not intended for use by persons (including children) with reduced physical, sensory or mental
capabilities, or lack of experience and knowledge, unless they have been given instructions concerning use of
this appliance by a person responsible for its safety.
• Children should be supervised to ensure they do not play with the appliance.
• If the power cord is ever damaged, it must be replaced by the manufacturer or authorized service personnel with
a special cord available from the manufacturer or its authorized service personnel in order to avoid a hazard.
INITIAL SET-UP
CAUTION – The brewer must be disconnected from the power source throughout the initial set-up, except when
specified in the instructions.
NOTE: ECA Models Only -This brewer is equipped with a temperature sensor that indicates when to brew and, when
selected, locks-out the start of a brew cycle until the water has heated to the optimum brewing temperature.
1. Remove the front panel beneath the sprayhead.
Models with electronic control assemblies:
Place the tank heater switch at the top of the control assembly in the “OFF” position.
Replace the front panel.
Models with electro/mechanical thermostats:
Rotate the control thermostat knob fully counterclockwise to the “OFF” position.
Replace the front panel.
2. Connect the brewer to the power source. Water will begin flowing into the tank.
3. When water stops flowing into the tank, remove the front panel and proceed as directed:
Models with electronic control assemblies:
Place the tank heater switch at the top of the control assembly in the “ON” position and replace the front
panel.
Models with electro/mechanical thermostats:
Rotate the control thermostat knob fully clockwise to the “ON” position and replace the front panel.
4. Wait approximately twenty minutes for the water in the tank to heat to the proper temperature.
5. Place an empty server beneath either brew station and the ON/OFF switch in the upper ("ON") position.
6. Triple-set Timers only: Place the brew station Selector switch in the 1
1
⁄
2
gallon position.
7. (A) Initiate a brew cycle; after water has stopped flowing from the funnel, place the ON/OFF switch in the
lower ("OFF") position and check the water volume in the server. It should be 192 ounces (5.7 L) for 1 1/2
gallons. If not, adjust the timer as required. Refer to Adjusting Brew Volumes
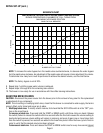
NOTE: Each batch setting must be adjusted individually, if they are not correct. Volumes are as follows:
1 gallon - 128 ounces (3.8L)
.5 gallon - 64 ounces (1.9L)
(B) If necessary adjust the needle valve to achieve desired water volume to be bypassed around the coffee
filter in the funnel.
Plumbing Hook-Up