


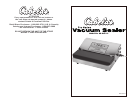
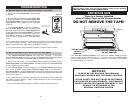

I
O
-8-
.
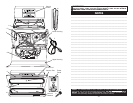
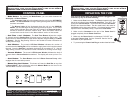
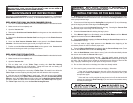
Mode Button: By pressing the Mode Button, you can switch between the
Automatic and Manual Modes.
.
The Automatic Light will be illuminated when the unit is in the AUTOMATIC
MODE. The Vacuum Sealer will begin sealing the bag after the air in the bag
has been evacuated.
.
The Manual Light will be illuminated when the unit is in the MANUAL
MODE; you can now begin the bag sealing process at anytime. This is useful
when sealing delicate items that might be crushed if the Vacuum Sealer is
allowed to reach its maximum vacuum level. More information about the
manual mode can be found in the “Manual Mode” section of this booklet.
.
Seal Time + and - Buttons: The Seal Time Button adjusts the number
of seconds that the Sealing Bar will apply heat to create the bag’s seal. The
optimal time for different brands of bags can be adjusted using the Plus (+) or Minus
(-) Buttons. See the “Bag Sealing” section in this booklet for further information on
sealing vacuum bags.
.
Seal Window: The numeric LED Seal Window indicates the number of
seconds that the Sealing Bar will be activated to apply heat to the bag that creates
the seal. Once the Seal Bar is activated, the display will countdown to “0”. See the
“Bag Sealing” section in this booklet for further information on sealing vacuum bags.
.
Vacuum Window: The numeric LED Vacuum Window indicates the level of
vacuum that the Vacuum Sealer has attained. The display will count up from “0” to
“9”.
.
Start Button: The Start Button starts the 2-Piston Vacuum Pump, which
engages the air evacuation process.
.
Manual Bag Seal Button: This button will start the Seal Bar at any time
in Manual Mode. More information about the Manual Mode can be found in the
“Manual Mode” section of his booklet.
CONTROL PANEL
-17-
WARNING! Before cleaning, assembling or disassembling the
Vacuum Sealer, make sure the Vacuum Sealer is OFF and the PLUG IS
REMOVED FROM THE OUTLET/POWER SOURCE!
NOTE: The Vacuum Sealer is ONLY intended to be used with VACUUM BAGS. For
best results, only use the recommended vacuum bags. DO NOT USE HOUSEHOLD
BAGS! Any other uses of the Vacuum Sealer, other than the uses described in this
booklet, could potentially damage the appliance and void the warranty!
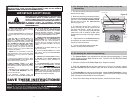
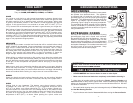
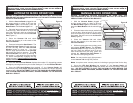
REPLACING THE FUSE
If the Vacuum Sealer does not operate when it is plugged in and
turned on, try any or all of the following:
1. Make sure the Fuse is not blown. The Fuse is located on the right
side of the unit directly above the Power Cord Port. Turn “OFF” and
unplug the Vacuum Sealer. Twist off and remove the Fuse Holder.
Remove and check the Fuse. The thin metal band in the center of
the Fuse should be clean and unbroken. If it is burned and/or broken,
replace it with a new Fuse (8 Amp). Replace the Fuse Holder.
2. Make sure the Connector at the end of the Power Cord is
plugged completely into the Power Cord Port.
3. Make sure the Power Cord is not damaged. DO NOT use
a damaged Power Cord. Call the Customer Service line for
information on part replacement.
4. Try connecting the Power Cord Plug to another electrical outlet.
Figure E
WARNING! Before cleaning, assembling or disassembling the
Vacuum Sealer, make sure the Vacuum Sealer is OFF and the PLUG IS
REMOVED FROM THE OUTLET/POWER SOURCE!