


-9--12-
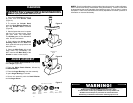
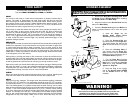
STUFFER ASSEMBLY
1. Remove the Ring Nut, Grinding Plate, Knife
and Auger from the Grinder Head before installing
the Grinder Head to the Main Body.
2. Align the notches in the Grinder Head with the
tabs on the Main Body.
3. Press the Grinder Head against the Motor and
rotate it counterclockwise until it locks into place
(Figure H).
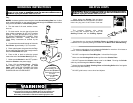
4. Insert the Auger
into the Grinder Head,
Auger Driver end rst
(Figure I).
5. Place the Stufng
Spacer into the Grinder
Head. Make sure the
notch of the Stufng
Spacer ts into the
positioning pin of the
Grinder Head.
6. Insert the Stufng
Funnel through the Ring
Nut and then onto the
Grinder Head.
7. Turn the Ring
Nut clockwise onto the
threaded end of the
Grinder Head until it
touches the Stufng
Funnel. DO NOT over-
tighten the Ring Nut.
8. Place the Tray on
the upright part of the
Grinder Head.
NEVER
use the Grinder without
the Tray installed!
Figure H
WARNING! Before cleaning, assembling or disassembling the Grinder,
make sure the PLUG IS REMOVED FROM THE OUTLET/POWER SOURCE!
ALWAYS unplug the Grinder when not in use.
NEVER operate Grinder without the Tray secured in place.
To avoid serious or fatal injury, NEVER reach into any Grinder inlet.
ALWAYS use the Stomper to push food into the Grinder Head.
Read & fully understand all instructions & warnings prior to use.
WARNING!
Front Ring
Nut
Stufng
Funnel
Stufng
Spacer
Auger
Assembly
Grinder
Head
Tray
Stomper
with Lid
Auger
Driver
Figure I
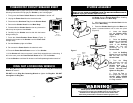
RING NUT LOOSENING WRENCH
If the Ring Nut becomes hard to remove, you can use the Ring Nut Loosening
Wrench to loosen it.
DO NOT use the Ring Nut Loosening Wrench to tighten the Ring Nut. DO NOT
over-tighten the Ring Nut.
THERMOSTAT CIRCUIT BREAKER RESET
If the Grinder suddenly stops during use, it either is overheating or has jammed. The
following instructions will help get your Grinder up and running again.
1. Firmly press the Power Switch Button so the Grinder is turned “off.”
2. Unplug the Power Cord from the electrical outlet.
3. Disconnect the Aluminum Tray from the Grinder Head.
4. Remove the Grinder Head from the Main Body.
5. Disassemble the Grinder Head to clear any obstruction
which may have jammed the Grinder.
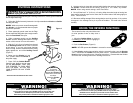
6. Carefully lay the Grinder onto its side with the bottom
facing toward you.
7. Press the Circuit Breaker Reset Button (Figure L)
located on the bottom of the Grinder near the Power Cord
storage cavity.
8. Set the Grinder upright on its Feet.
9. Re-connect the Power Cord to the electrical outlet.
10. Press the Power Switch Button to turn “on” the Grinder.
11. If the Grinder still does not operate, it most likely stopped due to overheating. If
this is the case, press the Power Switch Button to turn “off” the Grinder.
12. Let the Grinder to cool about 20 minutes or until it will operate again when turned “on.”
Figure L
Circuit
Breaker
Reset Button