


important factors for the right espres-
so flow and the crema production are
• correct grind
• water temperature
If the grind is too fine, no water or
very little water will pass through the
coffee. The result is no coffee or a bitter
coffee without crema.
CAUTION: Too much pressure!
If no water or very little water passes
through the machine, pressure will
build up. Turn the selector switch
back to the "O"-position and let sit for
a minute. Then remove the porta filter
very slowly, so that the excess pres-
sure can escape. If you remove the
porta filter too fast, hot ground coffee
can jump out of the porta filter.
If the
grind is too coarse, water will
pass through too fast. The result is a
weak coffee with little crema.
8. THE COFFEE GRIND
It is very important that your coffee is
ground correctly.
Ask your local coffee
store to grind your espresso about
two to three settings coarser than
usual.
The vast majorities of coffee
specialty houses have properly main-
tained grinders and will be able to
accommodate your request.
(Supermarket grinders may not
always be maintained properly. Like
home blade grinders, they may produce
a lot of coffee dust. Coffee dust clogs
the sieve, even if the coffee looks
coarse.) If you have problems with the
flow-through of your coffee call:
HELP CALL: 1-800-767-3554.
If you prefer to grind your own beans
ALWAYS use a burr grinder. Capresso
offers a range of Burr Grinders which
will grind the coffee perfectly for your
espresso pump machine.
See www.capresso.com
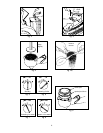
9. MAKING ESPRESSO
a.
Before making the first cup of
espresso we recommend that you
pre-warm the machine, filter holder,
and cup. Otherwise you may run
the risk that your first cup of espresso
is not as hot as it could be.
b. Insert and lock the filter holder
without a sieve and place an empty
cup underneath spout. Turn selector
knob to the cup position (fig. 6). Let
two or three ounces of water run
into the cup. Turn the selector knob
back to the "O"-position to stop
the flow of water (fig. 5).
c. Remove the porta filter, insert the
sieve and slightly overfill the sieve
with coffee. Use the tamper on the
end of the measuring scoop and
tamp (pack) the coffee slightly
down (fig. 4 ). Do not tamp too hard!
d. Remove any coffee from the rim of
the sieve (fig. 4a).
e. Insert the porta filter and turn to the
right until it is in the locked position
(you will here a "click" as it locks)
(fig. 3).
f. Place a cup underneath the porta
filter and turn the selector knob to
the coffee cup position. Once the
desired amount of coffee has been
dispensed into your cup, turn selec-
tor knob back to the "O"-position.
g. Remove the cup, add sugar to
taste, and enjoy immediately. (Do
not let an espresso sit for a long
period of time after brewing, as its
temperature will drop rapidly.)
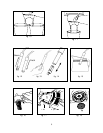
10. CLEANING PORTA FILTER AND
SIEVE AFTER EACH USE
Before making the next espresso:
a. Remove porta filter by turning it
to the left toward the"INSERT"-
position and release.
b. Tilt thumb guard forward until top is
over sieve and dump used coffee
grinds into garbage (fig. 18 ). If you
fail to place thumb guard over sieve
it will fall into the garbage.
9.