


GETTING TO KNOW THE WafflePro
®
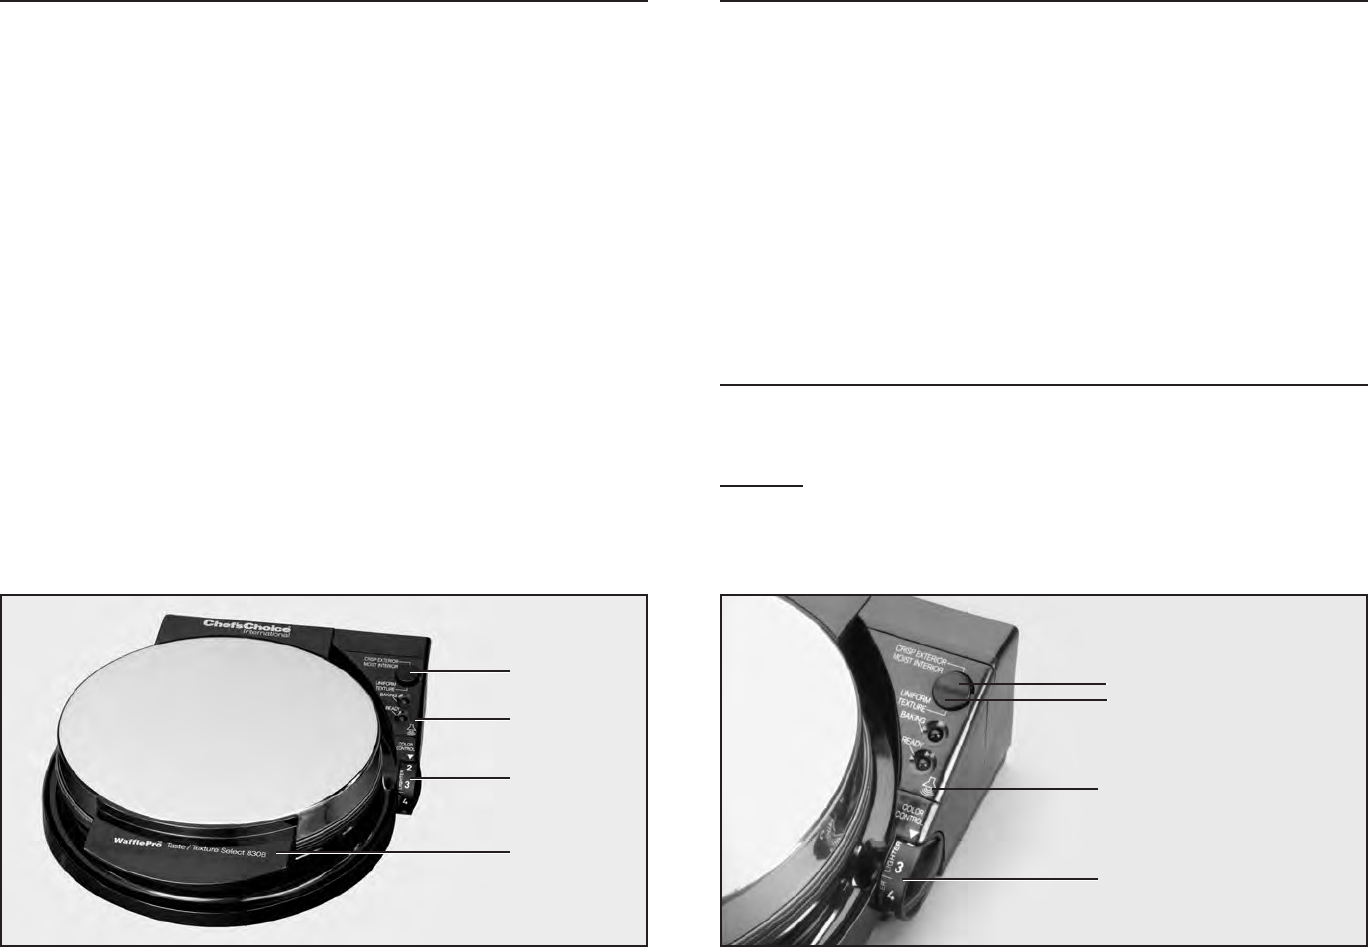
Take a minute to identify the key features and controls of the WafflePro
®
, (Figure 1) made of
high strength, high temperature engineering plastics with a polished stainless steel lid.
To open the lid, lift by the insulated front plastic handle. Electronic controls are on the control
panel, Figure 2.
Particularly important is the circular black Rocker Switch,Figures 1 and 2. Press the upper por-
tion of the rocker switch for a fast bake and for waffles with “Crisp Exterior/Moist Interior”, or
press at the bottom of the rocker switch for a deep bake and for waffles that have a more
“Uniform Texture” throughout.
Below the rocker switch is a red light marked “Baking” to indicate when the waffle plates are
being heated. Below that is a green light marked “Ready” to indicate either the waffle plate is
at baking temperature or the waffle is “Ready” to be served.
An audible “Ready Beeper” sounds when the green light comes on to further indicate when the
waffle is ready to serve.
The color control wheel is graduated numerically. The waffle will be darker or lighter in color
depending on the exact setting of this wheel and the position of the rocker switch. This control
wheel is relatively sensitive and fractional numerical changes can make a notable difference in
color. The common operating range for the color control is 3
1
⁄2 to 5. To darken the waffle, move
toward a higher number.
The lid has a unique hinge that allows the back of the lid to raise slightly as needed to main-
tain a uniform thickness of the waffle as it bakes and rises.
Provision has been made for cord storage as described in Storage Section. The cord can be
stored under the WafflePro
®
with its end secured in a slot molded into the base.
The WafflePro
®
can be stored upright to save shelf space. Simply close the lid and stand it
upright resting on the flat hinged end.
5
USING THE WafflePro
®
FOR THE FIRST TIME
Insert the WafflePro
®
power cord into a grounded 120 volt outlet and close the cover. The red
“baking” light will turn on immediately indicating the waffle plates are heating. Turn the color
control dial to 4. You can shorten the warm-up time by pressing firmly the top of the black
circular rocker switch adjacent to the marking “Crisp Exterior/Moist Interior.”
In about 3
1
⁄2 minutes the red light will turn off, the green Ready light will turn on and the
Beeper will sound indicating the WafflePro
®
is ready for baking. On the first heating you may
sense a slight odor during the heat-up cycle, typical of new heating elements with non-stick
surface coatings.
When “Ready”, open the lid and brush a light coating of vegetable or corn oil,melted margarine
or butter on the entire surface area of both the upper and lower heated grids (or you may use
non-stick cooking spray). Because both of the baking surfaces are factory finished with an anti-
stick coating, it is necessary to oil the surfaces only before the first time you use the WafflePro
®
.
It should not be necessary to oil again on subsequent use.
Pour about
1
⁄2 cup of waffle batter onto the middle of the lower grid and close the lid. Discard
the first waffle as it will absorb the excess oil you used on the grids.
WARM UP AND BAKING PROCEDURE
If the WafflePro
®
has not been used before, follow instructions above for “Using the WafflePro
®
for the First Time.”
If your are looking for a good recipe, see “Some Favorite Recipes”, (page 9).
WARM-UP
Plug the power cord into a grounded 120 volt outlet. Set the rocker switch to “Crisp Exterior/
Moist Interior” to begin the heat-up cycle.This setting places maximum heat on the waffle grids
and they will warm up in only 3
1
⁄2 minutes. If the switch is set to Uniform Texture, warm up time
will be about twice that long.The red“Baking”light will come on when theWafflePro
®
is plugged
4
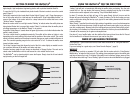
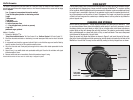
Figure 1. WafflePro
®
Taste/Texture Select
®
Handle for Lid
Color Control Dial
Control Panel
Rocker Switch
Figure 2. Control Panel
Audible “Ready” Beeper
Color Control Wheel
Rocker Switch
• Press here for fast bake
• Press here for deep bake