


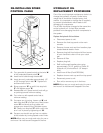

Coil Replacement
WARNING: Turn off electrical power supply.
1. Disconnect coil lead wires and green
grounding wire if present.
2. Remove retaining clip, nameplate and
housing.
WARNING: When metal retaining clip
disengages, it will spring upward.
3. Slip spring washer and coil off the solenoid
base subassembly.
4. Coil is now accessible for replacement.
Reassemble in reverse order of disassembly.
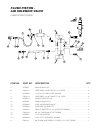
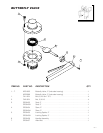
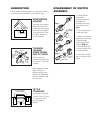
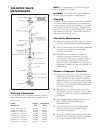
Use Solenoid Valve Exploded View Drawing
for identification and placement of parts.
CAUTION: Solenoid must be fully reassembled
because the housing and internal parts complete
the magnetic circuit.
Valve Disassembly
WARNING: Depressurize valve and turn off
electrical power supply.
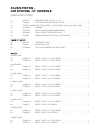
1. Disassemble valve in an orderly fashion. Use
exploded view for identification and
placement of parts.
2. If necessary, disconnect coil lead wires,
grounding wire (if present), and rigid conduit
from solenoid housing,
3. Remove retaining clip and slip the entire
solenoid enclosure off the solenoid base sub-
assembly.
WARNING: When metal retaining clip
disengages, it will spring upward,
4. Unscrew solenoid base sub-assembly and
remove core assembly, core spring, and
solenoid base gasket.
5. Remove bonnet screws, valve bonnet, piston
assembly, lip seal, support, inner and outer
body gaskets.
6. All parts are now accessible to clean or
replace; Replace worn or damaged parts.
However, for best results, replace all parts as
supplied with an Rebuild Kit.
Valve Reassembly
1. Reassemble in reverse order of disassembly.
Use exploded view for identification and
placement of parts.
2. Lubricate all gaskets with DOW CORNING
111® Compound lubricant or an equivalent
high-grade silicone grease.
3. Position support and inner and outer body
gaskets in valve body.
4. Position lip seal, flanged end up, onto piston
assembly. Install piston assembly with lip seal
into support in valve body cavity.
5. Replace valve bonnet and bonnet screws.
Torque bonnet screws in a crisscross manner
to 95
±
10 inch-pounds (10,7
±
1,1 newton-
meters).
6. Replace solenoid base gasket, core
assembly, and solenoid base sub-assembly.
Torque solenoid base sub-assembly to 175
±
25 inch-pounds (19,8
±
2,8 newton-meters).
7. Replace solenoid enclosure and retaining clip.
8. Restore line pressure and electrical power
supply to valve.
9. After maintenance is completed, operate the
valve a few times to be sure of proper
opening and closing.