9.Do not use torn, curled up, or misshapen slices of bread,as these may jam
the eject mechanism.
10.Should the bread carriage become jammed during the toasting cycle do not
attempt to release it. Switch off the power socket(if appropriate),then
unplug the toaster and allow it to cool down before carefully removing the
bread. Do not use a knife, fork or other sharp implement as this may cause
damage to the elements.
11.Position the mains lead so that it does not overhang a working surface as
this may cause a safety hazard, especially when there are children about.
Use the cord storage clips underneath the base to shorten the effective
length of the lead.
12.After use, switch off the power socket, if appropriate, then unplug the
toaster,allow it to cool down fully before cleaning and storing it away.
13.Clean the crumbs out of your toaster frequently.This will avoid a build up
of crumbs which could cause a fire hazard(see "care and cleaning")
14.Do not operate the toaster unless both crumb trays are correctly fitted.
15.Do not let the mains lead touch any hot surfaces.
16.Do not wrap the mains lead around the toaster, use the cord storage clips
underneath the base.
17.Examine the mains lead reqularly for signs of damage. If there is any sign
of damage-do not use the appliance, return it to our service Department
for replacement (see "after sales service"), as special tools are required.
There are no user-serviceable parts.
BEFORE USING FOR THE FIRST TIME
Before making toast for the first time, set the browning control to MAX.
without putting bread into the toasting slots, and lower the right bread
carriage handle, to switch on the elements in all four toasting slots.
This will help to burn off any dust etc. which may have accumulated on the
elements, The new elements may give off an unpleasant smell but this should
not be a cause for alarm. Ensure the room is well ventilated while doing this.
wash the bun warmer in war,. Soapy water,rinse and dry thoroughly, to
remove manufacturing dust, grease.etc.
Household use only
HOW TO USE YOUR TOASTER
1.Position the toaster on a firm, level,heat resistant surface, clear of
curtains and other combustible materials, Do not place the toaster on or
near items that may become damaged even by moderate sources of heat
2.Shorten the mains lead by wrapping excess lead round the clips underneath
the toaster.
3.Plug the mains lead into the power socket and, if necessary, switch the
socket on.
Toasting bread
1.Place bread centrally into the toasting slots.(Max.thickness of bread
25mm/1").For tall bread,lay the slices sideways in the slots.
if you are toasting one or two slices, you must use the left pair of toasting
slots (the ones above the CANCEL button).
2.Set the brownign control to the degree of browning required-moving the
browning control after toasting has started will not change the degree of browning.
3.if you are toasting one or two slices, press the left bread carriage handle down.
When toasting one or two slices, the eleement on the left of the third bread
slot will glow, This is normal and should not be a cause for concern.
4.if you are using three or four slots, you should press the right bread carriage
handle down (it will pull the other one down with it)
As this toaster is fitted with an electronic timer control, the bread carriage handle
will not lock down unless the toaster is connected to the electricity supply.
5.When the toasting cycle is completed,the toast will pop up.
Extra lift facility
After toasting small items (bagels, crumpets, etc) the bread carriage handles
may be raised further, to allow the toasted bagels, crumpets, etc. to be
removed more easily.
Cancel button
if you wish to stop a toasting cycle before it is complete, press the CANCEL
button, the elements will be switched off, and the toast will pop up.
Frozen bread
This feature takes the guesswork out of toasting frozen bread.
Leave the browning control at your favourite setting, put the frozen bread into
3
2.The plug fuse has not blown.
3.The main supply fuse has not blown/circuit breaker has not tripped.
if the appliance still does not work:
In the first instance, consult your retailer for possible repair or relacement.
If your retailer fails to solve your problem, and you need to return the
appliance to us, proceed as follows:
1.Pack it carefully.
2.Enclose your name, address, and daytime telephone number.
3.Give the reason why you are returning it.
4.If within the guarantee period, please state where and when purchased,
and include proof of purchase(e.g. till receipt)
5.We will let you have an estimated cost for inspection and / or repair.
HOUSEHOLD USE ONLY
Partes principales
1. Palanca
2. Botón Cancelar
3. Botón Recalentar
4. Botón Descongelar
5. Control de Tostado
6. Ranuras de Tostado
7. Bandeja para Migas
8. Placa de Metal
Instrucciones del cableado (en el Reino Unido)
Los alambres del cordón vienen de los siguientes colores:
Azul = Neutral Marrón = Línea Viva Verde o Verde y Amarillo =
Tierra
El alambre azul debe de conectarse al terminal en que viene marcado con
la letra N o de color negro.
El alambre marrón debe de conectarse al terminal que viene marcado con
la letra L o de color rojo.
El alambre verde (o verde y amarillo) debe de conectarse al terminal que
viene marcado con la letra E o de color verde (o verde y amarillo).
Cómo utilizar la tostadora
1. Asegúrese de que la tostadora se encuentre conectada a la electricidad
y que se le haya encendido.
2. Coloque una o dos rebanadas de pan dentro de las ranuras de tostado
y baje la palanca hasta que quede asegurada.
3. La tostadora comenzará a calentarse automáticamente y el proceso de
tostado se iniciará.
4. Regule el control de tostado para alcanzar el nivel o color de tostado
deseado.
5. Para detener el proceso de tostado, presione el botón CANCEL
(cancelar) en cualquier momento.
6. Levante la palanca para vericar el estado del pan durante el proceso
de tostado.
7. Cuando el tostado nalice, la palanca se levantará o saltará
automáticamente. Ahora podrá retirarse las tostadas sin peligro alguno.
8. Si el pan no ha quedado sucientemente tostado, puede colocársele de
nuevo dentro de la tostadora para tostarlo un poco más.
9. Regule el control de tostado colocando en el menor nivel y coloque
el pan. Asegúrese de que el pan no vaya a quemarse al momento de
retostarlo.
Control de tostado (color del tostado)
El control de tostado permite regular el tiempo de tostado el cual cuenta
con niveles del 1 al 6.
Please read these instructions carefully
Thank you for choosing this quality product from FORTUNE.
We are confident that it will give you excellent service. Our products
are engineered to meet the highest standards of quality, functionality
and design,We hope you thoroughly you new FORTUNE.
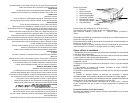
Main part
1
1.Loading handle
6
2.Cancel Button
3.Reheat Button
2
4.Frozen Button
5.Browning Control
7 5
6.Toasting Slots
3
7.Cumb Tray
4
IMPORTANT SAFEGUARDS
When using electrical appliances, basic safety precautions should always be
followed, including the following:
1.In common with other portable electrical appliances this toaster
must bever be put in water, used in a bathroom or used near water
contained in a bath-tub, basin or any other vessel. Do not use outdoors.
2.Position the toaster on a firm, level, heat-resistant surface, close to a
power socket and out of the reach of children.
3.The toaster must not be used near or below curtains or other combustible
materials and it must be watched, as bread if overcooked can catch fire.
4.The area round the toasting slots will become hot during use.Do not
touch these surfaces.
5.Do not allow anything to enter any of the "empty" slots while toasting,as
the central elements are "live"when the left bread carriage handle is lowered.
6.Do not allow the toasting slots to become covered during toasting.
7.Do not toast"buttered" items, and do not make toasted sandwiches in the
toaster,as this will create a fire hazard.
8.Pitta bread, waffles and similar products are unsuitable for use in an
automatic toaster as they may expel fats on to the elements, creating a
fire hazard.
1


