


5
The following instructions are intended for a qualified fit-
ter to guide him/her along the installation, adjustment and
technical maintenance procedures as correctly as possi-
ble and in full compliance with the applicable norms in
force.
Important : unplug the hob before all operations.
Installation
• This hob can be built into a worktop simply by cut-
ting out the corresponding slot.
• The worktop must be made with a material designed
to withstand a temperature of approximately 100°C.
• The hob should be positioned at least 40 mm (for
mod:KBM 6011DH - KBM 6001 H the hob should be
positioned at least 55 mm) away from the back wall or
any other vertical surface in order to allow for correct
ventilation and to prevent the surfaces around the ap-
pliance from overheating.
• If you wish to install the hob on top of an oven, the
latter must be fitted with a cooling fan.
• Try to avoid installing the hob on top of a dishwasher;
if this is unavoidable, place a watertight separating el-
ement between the two appliances.
10
Distance to
keep between the
cut-out slot and
the cabinet
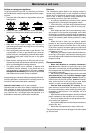
Fastening
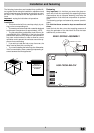
Very important: It is vital that you ensure the glass ce-
ramic hob is built into a perfectly flat supporting surface.
Deformations due to improper fastening could alter the
characteristics of the hob and compromise its perform-
ance.
The fastening springs are fastened by screws (see dia-
gram).
It is vital that these screws be kept accessible at all
times.
Insert the hob into the cut-out slot, applying pressure all
along the perimeter of the hob frame so that the latter
adheres fully to the worktop.
FRONT OF HOB
KITCHEN
WORKTOP
30
40
REAR SPRING ASSEMBLY
HOB FROM BELOW
Installation and fastening
560 +/- 1
490 +/- 1
48
574
504