


Impinger I – 1450 Series Service Manual - Domestic8
REMOVAL, INSTALLATION & ADJUSTMENTS
IMPINGER ADVANTAGE SERIES
CAUTION!
BEFORE REMOVING OR INSTALLING ANY COMPONENT IN THE IMPINGER
OVEN BE SURE TO DISCONNECT ELECTRICAL POWER AND GAS SUPPLY
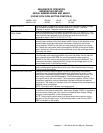
MOTOR, MAIN FAN - REPLACEMENT
1. Shut off power at main breaker.
2. Remove louvered motor cover from back of oven.
3. Remove wireway by taking out the (5) five hex screws.
4. Disconnect wiring from motor.
5. Remove the twelve (12) hex head bolts from the oven back and slide back straight out of the oven.
6. Remove two (2) bolts from fan hub and remove fan from motor shaft.
NOTE: Measure distance from fan blade to rear wall assembly before removal to aid in reassembly.
7. Remove the eight (8) hex head bolts from the motor mount and slide the motor assembly out of the oven
back.
8. Remove motor by taking off motor clamp and removing the four (4) mounting nuts and washers.
9. Reassemble in reverse order. When motor mount assembly is set on the oven back, align motor shaft in
the center of the hole. Set fan assembly on the motor shaft.
NOTE: A. Torque specs on bolts (150 in/lb. torque)
B. It is recommended that an anti-seize compound be brushed on to the bolts around the back
and motor mount bracket before assembly.
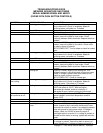
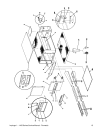
FAN, MAIN - REPLACEMENT
1. Shut off power at main breaker.
2. Remove back assembly. (See MOTOR, MAIN FAN)
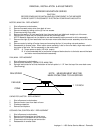
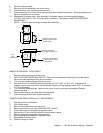
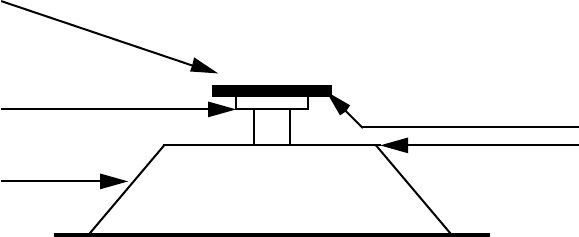
3. Reinstall and locate fan so that the bottom of the fan spider is 1 1/2" from the top of the oven back cone.
(See Drawing)
FAN HUB
CONE
FAN SPIDER
1 1/2 INCH
NOTE: MEASUREMENT MUST BE
MADE FROM CONE TO FAN SPIDER
CAPACITOR, MOTOR - REPLACEMENT
1. Shut off power at main breaker.
2. Remove motor cover from back of oven.
3. Discharge capacitor.
4. Remove and replace.
COOLING FAN, CONTROL BOX - REPLACEMENT
1. Shut off power at main breaker.
2. Remove control panel top and front cover.
3. Remove four (4) screws from the fan frame.
4. Disconnect cord and plug and remove fan.
5. Reassemble in reverse order.