


3
INTRODUCTION
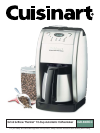
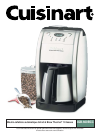
Get ready to savour hot, fresh, flavourful coffee
– all day long! The Cuisinart
®
Grind & Brew
Thermal
™
10-Cup Automatic Coffeemaker is
Cuisinart technology at its best. This fully
programmable deluxe Premier Series model
integrates the best coffee making technology,
streamlined European design, and smooth
brushed stainless steel to create the perfect
coffeemaker.
The Grind & Brew Thermal
™
makes it easy to
enjoy delicious gourmet coffee at home.
Simply place whole beans into the separate
grinding chamber, add water, set the flavour
control to 1-4 or 5+ cups, and program start-
time up to 24 hours in advance. Coffee brews
through and, pours through a self-sealing lid
into a double-wall insulated thermal carafe to
keep it fresh and hot for hours. A charcoal
water filter and a permanent commercial-style
gold tone coffee filter let only pure coffee
flavour flow through, and the popular Brew
Pause
™
feature even lets you sneak a cup
before the cycle is finished.
Cuisinart is famous for its ease of use.
The Grind & Brew Thermal
™
10-Cup Automatic
Coffeemaker has a separate grinding
assembly and filter chamber to make beans
easy to add and used grounds easy to
remove. A convenient “grind off” control
lets you turn the grinder off when using
preground coffee.
Cuisinart is also famous for easy cleanups.
Dishwasher safe parts. Separate grind and
filter chambers, and a spectacular brushed
stainless steel housing that wipes clean in
seconds. Get ready to savor the good life!
TABLE OF CONTENTS
Important Safeguards . . . . . . . . . . . . . Page 1
Unpacking Instructions . . . . . . . . . . . . Page 3
Introduction. . . . . . . . . . . . . . . . . . . . . Page 3
The Quest for the
Perfect Cup of Coffee. . . . . . . . . . . . . Page 4
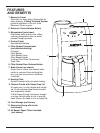
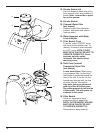
Features and Benefits . . . . . . . . . . . . Page 5
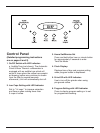
Control Panel . . . . . . . . . . . . . . . . . . . Page 7
Programming Your Coffeemaker . . . . Page 8
Setting the Time . . . . . . . . . . . . . . . . . Page 8
Programming the Auto On . . . . . . . . . Page 8
Changing the Water Filter. . . . . . . . . . Page 8
Making Coffee. . . . . . . . . . . . . . . . . . . Page 9
Cleaning and Maintenance. . . . . . . . . Page 11
Warranty . . . . . . . . . . . . . . . . . . . . . . . Page 12
IMPORTANT UNPACKING
INSTRUCTIONS
1. Place the box on a large, sturdy, flat surface.
2. Remove the instruction book “Starter Kit”
(paper filters, scoop, charcoal water filter) and
any other literature located on the top poly-
foam.
3. Turn the box so that the back side of the
coffeemaker is down and slide the
coffeemaker from the box.
4. After the coffeemaker has been removed,
place the box out of the way and lift off the
top polyfoam insert.
5. Remove cardboard insert from carafe handle.
6. Remove the cardboard insert between the
carafe lid and Brew Pause
TM
mechanism by
sliding it out of the unit.
7. Grasp the carafe by its handle, remove it from
the resting plate, and remove the polybag.
8. Remove the polybag covering the coffeemaker.
We suggest you save all packing materials
in the event that future shipping of the
machine is needed. Keep all plastic bags
away from children.