


6
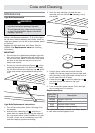
Once the lens retaining ring and lens are 3.
removed, pull the old bulb
C
sideways, out of
the socket.
Using a glove, insert the new bulb into the 4.
socket. Line up the prongs on the new light blub
with the holes in the light socket. Gently push in
on the new bulb until it stops.
Center the lens5.
D
on the lens retaining ring
B
and snap it back into place on the light
fixture A .
Turn on the main power switch. Touch the light 6.
key to make sure it is working.
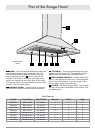
Replacement Parts
Dacor Part
Number
Description
106660 Halogen light bulb
101952 Filter
A302 Stainless steel cleaner
A300 Cooktop cleaning creme
For replacement parts, contact your Dacor dealer
or visit www.everythingdacor.com.
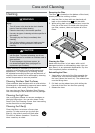
Care and Cleaning
Maintenance
Light Bulb Replacement
WARNING
To prevent electric shock turn off power at the fuse •
or junction box before replacing a light bulb.
To avoid personal injury, make sure the cooktop •
or range, the hood and the light are cool before
changing a light bulb.
Light bulb replacement is considered to be a hom-
eowner maintenance operation. If all of the lights
do not work, before replacing any bulbs, check to
make sure power is on at the circuit breaker panel
or fuse box.
Replace the light bulb only with Dacor Part No.
106660. See Replacement Parts for ordering
information.
IMPORTANT:
Do not touch the replacement halogen light bulb •
with your fingers. Halogen bulbs are sensitive to
the oils from your hand. The oils from your hand
will stick to the bulb and cause it to burn out
faster than normal.
Do not pry out the entire light fixture • A , when
replacing the light bulb. It is difficult to reinstall.
Pry out only the the lens retaining ring
B , which
is the inner metal ring attached to the light fix-
ture.
Light Bulb Replacement Instructions
Turn off the main power switch. See page 3 for 1.
the location.
Hold the lens retaining ring 2.
B
and lens in
place with one hand while prying the edge of
the ring loose with a small screwdriver or plas-
tic knife. If you use a screwdriver, cover the
end with tape to prevent scratching.
B
A
B
C
D
A