


9
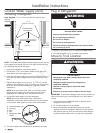
Install Anti-Tip Boards
IMPORTANT:
To avoid tipping during use, the solid soffit must be within 1”
(2.5 cm) maximum above the refrigerator. If the solid soffit
is higher than 1” (2.5 cm) or one is not available, then the
refrigerator must be braced.
It is recommended that board(s) be installed before the
refrigerator is installed.
Board(s) must be long enough to fully cover the width of the
compressor cover.
Locate the board(s) so the bottom surface(s) of the board(s) is
(are) 84” (213.4 cm) from the floor.
During installation, raise the refrigerator up so there is ¼”
(6.4 mm) maximum between the top of the refrigerator and the
bottom of the anti-tip board(s). Do not crush the compressor
cover when raising the rear leveling legs.
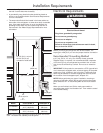
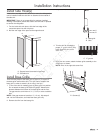
To Install Anti-tip Boards
1. Mark the stud locations on the rear wall 80” to 90” (203.2 cm
to 228.6 cm) above the floor.
2. Securely attach one or two 2” x 4” x 32” (5.1 cm x 10.2 cm x
81.3 cm) boards to the wall studs behind refrigerator. Use six
#8 x 3” (7.6 cm) (or longer) wood screws. The wood screws
must be screwed into the studs at least 1½” (3.8 cm). The
board(s) must overlap the compressor cover.
Installation Instructions
Connect Water Supply
Read all directions before you begin.
IMPORTANT: If you turn the refrigerator on before the water line
is connected, turn the ice maker OFF.
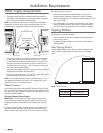
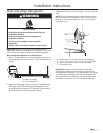
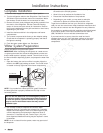
Install Saddle Valve
NOTE: If the existing water line meets the Water Supply
Requirements, see Connecting to Refrigerator.
1. Unplug the refrigerator or disconnect power.
2. Turn OFF the main water supply. Turn ON the nearest faucet
long enough to clear the line of water.
3. Locate a ½” to 1¼” (1.3 cm to 3.2 cm) vertical cold water pipe
near the refrigerator.
IMPORTANT:
Make sure it is a cold water pipe.
A horizontal pipe will work, but drill on the top side of the pipe,
not the bottom. Doing so will help keep water away from the
drill and normal sediment from collecting in the valve.
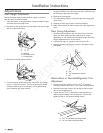
4. Using a cordless drill, drill a ¼” (6.4 mm) hole in the cold water
pipe you have selected.
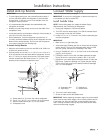
5. Fasten the shutoff valve to the cold water pipe with the pipe
clamp. Be sure the outlet end is solidly in the ¼” (6.4 mm)
drilled hole in the water pipe and that the washer is under the
pipe clamp. Tighten the packing nut. Tighten the pipe clamp
screws slowly and evenly so the washer makes a watertight
seal. Do not overtighten.
6. Turn on the main water supply.
7. Check for leaks around the saddle valve.
IMPORTANT: Before attaching the water supply line to the shutoff
valve, flush the main water supply line to remove particles and air
in the water line. Allow enough flow so that the water becomes
clear. Flushing the water line may help avoid filters and/or water
valves from becoming clogged.
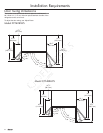
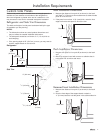
A. Center board 1/4” (6.4 mm) max. above refrigerator
B. Two 2” x 4” x 32” (5.1 cm x 10.2 cm x 81.3 cm) boards
C. Attach to studs with six #8 x 3” (7.6 cm) screws
D. Compressor cover
2” (5.1 cm)
A
B
C
D
A
B
D
C
A. Cold water pipe
B. Pipe clamp
C. Packing nut
D. Shutoff valve