


16
Cleaning (Continued)
Knobs and Trim Rings
WARNING
Do not operate the cooktop without the knobs and spill •
protector rings in place.
Do not soak the knobs and spill protector rings in water •
or place them in the dishwasher.
Do not expose the knobs or spill protector rings to •
direct flame, hot utensils or other sources of heat.
Wash the knobs regularly with a solution of warm
soapy water. Dacor recommends hand dishwashing
liquid. To clean:
Disconnect power and turn the knobs to the off 1.
position to remove them for cleaning or replace-
ment.
Grasp each knob and pull straight back, off of 2.
the valve shaft.
Clean the outside edges of the trim rings while 3.
the knobs are removed. Wipe them with a soft
damp rag.
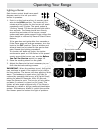
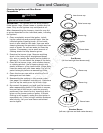
To replace the knobs, 4.
align the “D-shaped”
opening on the
back of the knob
with the end of the
valve shaft. Care-
fully push the knob
on until it stops. The
largest knob with
numbers on it is the
oven knob and goes
on the center valve stem. On the dual burner
knobs, the high flame and simmer (low) icons
are spaced further apart than the other four
knobs. Install them on the valve stem that is
second from the left and second from the right.
Reconnect the power cord.5.
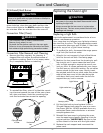
Door Glass
Clean all glass surfaces with a solution of mild
detergent and hot water. Use a mild glass cleaner to
remove fingerprints or smears. Dry completely with
a soft, lint-free cloth.
Stainless Steel Surfaces
The outside surface of the range are covered with
stainless steel. Clean these surfaces with Dacor
Stainless Steel Cleaner (see page 19 to reorder).
Rinse and dry with a soft, lint-free cloth. Always
wipe stainless steel surfaces with the grain. A small
amount of baby oil may be applied to stainless steel
tops to restore lustre.
Care and Cleaning
Brass, Chrome and Copper Surfaces
Clean brass, chrome and copper surfaces the same
way as stainless steel surfaces (see column one).
Porcelain Surfaces
The oven interior, the inner side of the oven door
and the spill tray are finished in porcelain enamel.
Clean porcelain surfaces with a solution of mild
detergent and hot water. Rinse and dry with a soft
cloth. Do not use abrasives or commercial oven
cleaners. You may remove the rack supports to
clean the surfaces behind them more easily.
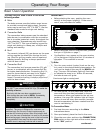
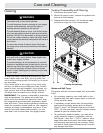
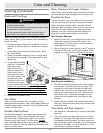
Rack Support Removal
With the oven cool, pull straight out on the front 1.
of the rack support, toward the center. The
mounting pins on the front of the rack should
disengage from the oven.
While holding the rack support at a 45˚ angle to 2.
the side of the oven, gently pull forward to dis-
engage the rear mounting pins from the oven.
Rack Support Installation
One set of mounting pins on each rack support 1.
are straight, the other set is at an angle. The
angular pins go toward the back of the oven.
Insert them in the rear mounting holes while
holding the rack support at a 45˚ angle to the
side of the oven. To prevent damage, do not
insert the rack support with the angular pins
forward.
Rotate the front of the rack towards the wall of 2.
the oven. Slide the front rack pins into the front
mounting holes.
Oven Racks and Rack Supports
See above for instructions on removing the rack •
supports.
The oven racks and rack supports are chrome-•
plated. For everyday cleaning, apply a solution
of detergent and hot water. To clean heavy soil,
use the rough side of a sponge or a scouring pad
with plenty of water, or use a solution of 1 cup
ammonia to 2 gallons of water.