


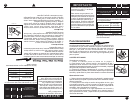

NOTA: Para operar esta estufa con gas natural,
se requiere el juego de conversión de acuerdo
con la siguiente tabla:
No. de juego
Modelo de estufa de conversión
5
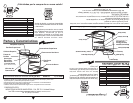
IMPORTANTE
GAS LP PRESIÓN DE OPERACIÓN
2,75 kPa (28 cm Col. agua)
Esta estufa está preparada para
funcionar con gas L.P. de tanque
móvil o estacionario.
Para usarse con gas natural ( de
tubería) debe llamar a Servicio Acros
Whirlpool para cambiar las espreas
y hacer los ajustes necesarios, el
número telefónico aparece en la
última página. El técnico calificado
debe cerciorarse que la conexión
no tiene fugas y que la presión de
gas en la estufa es la que aparece
en las tablas.
QUEMADOR
SUPERIOR
HORNO
ESPREA
69
62
mm
0,741
0,965
kJ/h
6 500
10 000
DIAM.
ESPREA
CAPACIDAD
TERMICA
QUEMADOR
SUPERIOR
HORNO
ESPREA
56
53
mm
1,181
1,511
kJ/h
6 500
10 000
DIAM.
ESPREA
CAPACIDAD
TERMICA
GAS NATURAL PRESIÓN DE OPERACIÓN
1,76 kPa (18 cm Col. agua)
5
IMPORTANT
NOTE: To operate this range with natural gas, is
required a kit according to the chart:
This kit is available at your nearest Authorized
Service Center.
Range Model Kit Number
This range is adjusted at the factory
for use with L.P. gas.
To use this range with natural gas,
you must replace the surface and
oven burner orifices, call Servicio
Acros-Whirlpool, the phone number
is shown in the last page. The
technician must make sure that the
connections have no leaks and the
gas pressure in the range is the
same as shown in the charts.
LP GAS OPERATING PRESSURE
11 in WATER COLUMN
(6,36 oz/squared inch)
BURNER
UPPER
OVEN
NUMBER
69
62
INCHES
0,741
0,965
BTU/h
6 500
10 000
ORIFICE
DIAMETER
THERMAL
CAPACITY
ORIFICE
NATURAL GAS OPERATING
PRESSURE 7 in WATER COLUMN
(4,04 oz/squared inch)
BURNER
UPPER
OVEN
NUMBER
56
53
INCHES
1,181
1,511
BTU/h
6 500
10 000
ORIFICE
DIAMETER
THERMAL
CAPACITY
ORIFICE
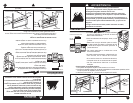
Funcionamiento
Las diferentes altitudes sobre el nivel del mar y las variaciones en
el suministro de gas, hacen necesario regular la entrada de aire
primario a los quemadores para obtener una adecuada mezcla de
aire-gas y así tener un buen funcionamiento en la estufa.
Revise que las flamas de los quemadores superiores y el horno
sean estables y azuladas, de no ser así siga los siguientes pasos
para su ajuste.
AJUSTES DE FLAMAS
Quemadores superiores
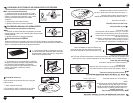
1.- Retire la cubierta como se indica en la página 4
2.- Para ajustar el aire, afloje el tornillo del regulador de aire y
desplácelo hacia delante o hacia atrás (si la flama es amarilla,
desplácelo ligeramente hacia atrás; si la flama es inestable y separada
del quemador, desplácelo hacia delante)
3.- Coloque la cubierta y quemadores en su lugar y revise que la
flama sea azulada y estable, de lo contrario espere a que el quemador
se enfrié y repita todos los pasos hasta obtener una flama adecuada
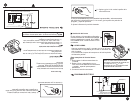
Quemador de horno
1.- Retire primero la charola del horno (ver página 8) y posteriormente
quite el tornillo que sujeta al quemador del horno al bastidor frontal,
retire el quemador.
2.- Para ajustar el aire afloje el tornillo del regulador de aire y gire
el regulador para abrir o cerrar la ventana (si la flama es amarilla,
abra ligeramente la ventana; si la flama es inestable y separada del
quemador, cierre ligeramente la ventana).
3.- Coloque el quemador en su lugar sujetándolo con el tornillo y
revise que la flama sea azulada y estable, de lo contrario espere a
que el quemador se enfrié y repita todos los pasos hasta obtener
una flama adecuada.
REGULADOR
DE AIRE
Quemador Superior
TORNILLO
REGULADOR
Quemador de Horno.
How to Use Your Range
Because of different altitudes above sea level and variations
in the supply of gas, you may need to adjust the main air
intake to the burners. This will result in a better air-gas mixture
and thus of better operation.
Check surface burners and oven burner for proper flame,
flame must be steady and blue, if not follow below instructions
for flame adjustment.
Surface Burners
1. - Remove cooktop as shown on page 4.
2.- Adjust air by loosing air shutter screw, move air shutter
forward or backwards (if flame is yellow, move air shutter
forward; if flame is blowing, move air shutter backwards).
3. - Replace cooktop and surface burners, check burner for
proper flame, if the flame is still not properly adjusted, wait
for the burner to cool down and repeat steps 1 and 2 until
flame is properly adjusted.
Oven Burner
1. - Remove oven tray (see page 8), remove screw on front
frame and then remove oven burner from range.
2.- Adjust air by loosing air shutter screw and turn air shutter
to open or close opening (if flame is yellow, open burner
opening; if flame is blowing, close opening)
3. - Replace oven burner and tighten shutter screw, check
burner for proper flame, if the flame is still not properly
adjusted, wait for the burner to cool down and repeat steps
1 and 2 until flame is properly adjusted.
AIR
SHUTTER
Top Burner
AIR
SHUTTER
SCREW
Oven Burner
Este juego está disponible con su Centro de
Servicio Autorizado.
SF11120
SF13120
SF13420
SE13500
98016197
98016197
98016197
98016197
SF11120
SF13120
SF13420
SE13500
98016197
98016197
98016197
98016197