


Read this instructions manual carefully before
installing and using the device. Only by doing so will
you be able to obtain the best results and the
maximum safety of use.
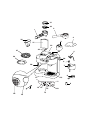
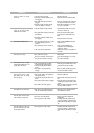
DESCRIPTION OF THE DEVICE
The terminology below will be used throughout the
pages that follow.
1. Filter holder for ground coffee
2. Filter holder for prefilled espresso pods (if fitted)
3. Steam boiler cap
4. Lid of milk tank
5. Frother
6. Mixer
7. Milk tank
8. Coffee measuring spoon
9. Anti-spray cover
10.Espresso delivery switch
11.Espresso on/off switch ( )
12.Steam boiler ‘ON’ pilot light
13.‘OK’ pilot light for cappuccino coffee
14.Steam boiler on/off switch ( )
15.Pilot light - espresso boiler on
16.‘OK’ pilot light for espresso coffee
17.Tube-brush
18.Tamper
19.Espresso boiler outlet
20.Removable water level window in tank for espresso
coffee
21.Water tank for espresso coffee
22.Lid of water tank for espresso coffee
23.Steam boiler
24.Steam knob
25.Drip-tray (milk)
26.Drip-tray (espresso)
27.Shelf for cups
28.Water measuring container for steam boiler
29.Absortion water sponge
30.1-cup filter
31.2-cup filter
INSTALLATION
• Place the coffee maker on a work surface at a safe
distance from taps and sinks.
• Check that the mains voltage corresponds to the
voltage indicated on the coffee maker’s information
plaque. Only connect the device to an outlet that has
a minimum delivery of 10 A and is fitted with the
required ground. The manufacturer will not be held
responsible for any accidents that may occur due to
the lack of grounding of the unit.
• In the event of incompatibility between the outlet and
the plug of the coffee maker, have the plug replaced
by a qualified electrician.
• Never install the machine in an environment that can
reach a temperature less than or equal to 0°C (if the
water in it freezes, the coffee maker may be
damaged).
HOW TO MAKE ESPRESSO COFFEE
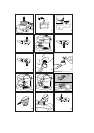
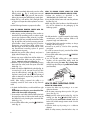
FILLING THE WATER TANK
Lift the lid and take out the water tank (fig. 1). Fill the
tank with fresh, clean water (fig. 2). Place the tank back
in its position, pressing it lightly so as to open the valve
located on the bottom of the tank itself.
It is recommended that the tank be filled when the
machine is cold. In the event of it being necessary to fill
it when the machine is warm, it is most likely that while
the tank is out, some water will collect in its seat. It is
necessary to dry this water using the sponge, which is
to be found on the bottom of the tank itself (fig. 3).
More simply, the tank can be filled without extracting it,
by pouring water directly into it from a carafe.
NOTE: never operate the coffee maker without water
in the tank.
The quantity of water contained in the tank may be
checked by looking into the tank through the window.
This allows you to add water when necessary.
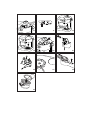
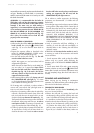
PREHEATING THE COFFEE UNIT
In order to obtain coffee at the right temperature, it is
suggest to preheat the machine. The best way to
accomplish this is by pressing the ESPRESSO switch
(fig. 4) at least half an hour before making the coffee.
During this time, it is necessary to leave the filter
holder attached to the machine. To attach the filter
holder, position it under the boiler outlet with the
handle towards the left (see fig. 5); push upwards and
at the same time rotate the handle towards the right;
always rotate as far as it will go. After a half hour, the
coffee can then be made as described in the next
section.
Alternatively, it is possible to carry out the preheating
quickly by following these steps:
1.Turn on the machine by pressing the ESPRESSO
switch (fig. 4).
2.Place a cup under the boiler outlet and make sure
that the filter holder is attached to the machine.
Use the same cup in wich the coffee will be served in,
so that it may be preheated.
3.Wait until the “ESPRESSO OK” pilot light turns on
7