


not possible to remove the cap because the threads do
not grip. Therefore, to fill the boiler, it is necessary
either to wait until all the water in it is used up or until
the boiler has cooled.
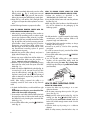
ATTENTION: it is recommended that the boiler be
filled when cold and that the measuring container
provided be used. If the boiler is filled while hot (for
example, if the water runs out while making a
cappuccino), it is recommended that only the contents
of one measuring container be used. NEVER TRY TO
FILL THE HOT BOILER UP TO THE MAXIMUM 170
GRAMS (6 oz.) marked on the boiler itself (fig. 14);
this is done, the machine will not froth the milk
properly on the next attempt.
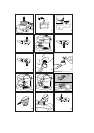
HOW TO PREPARE A CAPPUCCINO
• Before making the coffee, make sure that the steam
knob is closed, then press the CAPPUCCINO
switch (fig. 15) so as to allow the steam boiler to
preheat.
• Prepare the espresso coffees as described in the
HOW TO PREPARE ESPRESSO COFFEE section.
Don’t forget to use sufficiently large cups.
• Pour the milk into the milk tank (fig. 16). The milk
must be neither boiled nor warm.
NOTE: We suggest you used semi-skimed milk at
refrigerated temperature.
When the tank has been filled up to the MAX line,
you can make 2 or 3 cappuccinos. Never fill the
tank over the little notch that is located just above
the MAX sign (fig. 16); if the tank is too full, the
milk may continue to drip from the tube after the
cappuccino has been made.
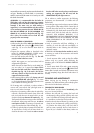
• Before starting delivery of the milk, always wait until
the ‘CAPPUCCINO OK’ pilot light (fig. 17) comes
on. This light indicates that the ideal temperature has
been reached for foaming the milk.
TIP: if starting with a cold boiler, in order to obtain a
warmer milk, wait until the ‘OK’ pilot light comes on
twice in a row (about 5 minutes).
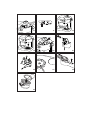
• Place the cup containing coffee under the tube of the
milk tank, check that the internal clamp of the milk
tank is secured, then turn the steam knob in an anti
clockwise direction at least one full rotation (fig. 18).
The foamed milk will start coming out from the tube of
the milk tank. When using small size cups, in order to
avoid squirts of milk it is necessary to insert the anti
spray cap onto the tube of the milk tank (fig. 19).
• Fill the cup with the desired quantity of foamed milk.
To stop the flow of milk, turn the steam knob in a
clockwise direction until closed. In order to ensure
that the milk froths correctly, always wait (between
making one cappuccino and the next) until the
CAPPUCCINO OK pilot light comes on.
TIP: to achieve a perfect cappuccino, the following
proportions are recommended: 1/3 coffee and 2/3
foamed milk.
• Once the last cappuccino has been prepared, before
turning off the coffee maker, lift the suction tube of
the tank above the level of any remaining milk (as
indicated in fig. 20), let the steam come out for a few
seconds, then close the knob with the tube thus
extracted. FOR HYGIENIC REASONS, IT IS
RECOMMENDED THAT THIS OPERATION ALWAYS
BE CARRIED OUT SO AS TO PREVENT THE MILK
FROM STAGNATING IN THE CIRCUITS OF THE
COFFEE MAKER.
• Lastly, to prevent the mild from solidifying, it is
necessary to wash the milk tank immediately, as
described below in the “Cleaning the milk foamer
and tank” section.
ATTENTION: the first time that the machine is used, it
is necessary to wash all the accessories and internal
circuits as follows:
1. For the espresso boiler: make at least five coffees
without using any ground coffee (following the
directions given in the HOW TO PREPARE ESPRESSO
COFFEE).
2. For the steam boiler: fill it with a water measuring
container, close the cap and press the CAPPUCCINO
button. After 5 minutes, turn the knob and let steam come
out until completely empty (this should take about 15
minutes).
CLEANING AND MAINTENANCE
Before carrying out any cleaning or maintenance
operations, turn off the machine, take out the plug from
the mains and let the device cool down.
CLEANING THE MILK-FOAMER
The milk foamer must be cleaned immediately after
every use. Proceed as follows:
• Remove the milk tank by pressing the hook and
simultaneously pulling upwards. Wash it with warm
water. To facilitate the cleaning of the milk tank tube,
it is possible to use the tube brush provided.
• Remove the red-coloured foamer by pressing on the
clamp (A) and simultaneously pulling upwards (fig.
21). Remove the rubber mixer, wash and clean it
with hot water, especially the four holes shown in
figure 22 (use a needle to clean these). Make sure
9
bar50 GB 7-11-2000 14:32 Pagina 9