


3. Set the minutes by repeatedly pressing the MIN
key.
4. After 5 seconds, the display will stop flashing and
the programmed time will be memorized.
5. Press the AUTO key; the AUTO light will come on
and at the programmed time the machine will
start to make the coffee.
If you wish to change the delayed start time once it
has been set, press the
AUTO key for about 2 seconds
before setting a new time as described from point 1
down.
Note: at the set time, the machine begins making
the coffee but the steam boiler does not come
on.
AUTO SHUT OFF TIME
The machine is programmed by the maker to keep the
coffee warm for 2 hours after percolation. It is,
however, possible to change this time by proceeding
as follows:
1. Press the ON/OFF coffee key for about 2 seconds
until “2:00” flashes on the display.
2. Modify the desired time by repeatedly pressing
the
HOUR key (and also the MIN key if required).
3. After setting the time wait for 5 seconds; when the
display stops flashing the time selected will be
memorized.
Note: if you set “0:00”, the machine keeps the
coffee warm for an unlimited period.
SETTING FOR 1-4 CUPS
In order to increase the strength of the coffee and
improve the aroma when fewer than 5 cups are
made, press the 1-4 cups key. The 1-4 cups light will
come on.
CHLORINE FILTER
The filter removes the taste of chlorine from the water.
To fit it, proceed as follows:
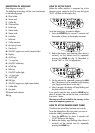
• Remove the chlorine filter from the plastic bag and
rinse it under the tap.
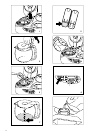
• Raise the coffee lid and remove the filter case
from its housing by pulling it upwards (fig. 1).
• Open the case by pressing on the special areas
marked “PUSH” and carefully position the filter in
the compartment as shown in fig. 2.
• Close the case and reinsert it in the housing,
pushing it right down.
• After 80 coffee cycles and after every six months
use, the chlorine filter should be replaced. As it is
made of biodegradable material, the filter can be
disposed of along with normal household waste.
PREPARING THE COFFEE
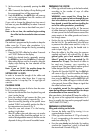
• Fill the jug with cold water up to the level marked,
according to the number of cups of coffee
required (fig. 3).
WARNING: never exceed the 10-cup line to
avoid causing water to leak out through the rear
slots in the machine; do not use water which has
been heated, to avoid the machine signalling the
end of the coffee percolation prematurely.
• Pour the water into the tank (fig. 4). The amount
of coffee obtained is slightly less than the amount
of water poured into the tank because some of the
water remains in the coffee grounds and some is
lost through steam.
• Position the jug on the hotplate (
Z), making sure
that the lid is on. The perforations in the lid serve
to preserve the coffee aroma and this is why it is
necessary to lift the jug by the handle side in
order to open it (fig. 3).
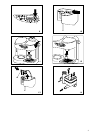
• Place the coffee in the filter using the measure
supplied and level it off uniformly (fig. 5).
As a
general guide, put a level measure of coffee
(about 7 grams) for each cup required (i.e. 10
measures for 10 cups).
The amount of coffee to
be used may, however, vary according to
personal taste. Use good quality medium-ground
coffee designed for filter coffee machines.
• Close the lid. Press the ON/OFF key; the
ON light
will come on (fig. 6) and the machine will begin
to make the coffee. (To make coffee at the pre-set
time press the
AUTO key and the AUTO light will
come on.) The coffee will begin to trickle out after
a few seconds; there will be 4 beeps to signal that
the coffee has been made.
It is completely normal for the appliance to emit
steam during coffee percolation and for a few drops
of condensation to form around the lid.
After percolation, the hotplate (Z) keeps the coffee in
the jug warm at the appropriate temperature for 2
hours (to modify this time see the paragraph headed
“AUTO SHUT OFF TIME”).
PREPARING CAPPUCCINOS
Filling and switching on the boiler
• Unscrew the boiler cap (E) by turning it in an
counterclockwise direction.
• Fill the jug with a maximum of 170 gr. of water (6
fl. oz.), corresponding to the amount required to
make one coffee (fig. 7).
• Pour the water
slowly into the boiler, first making
sure that the “cappuccino” switch is off and that
the steam knob is turned off (fig. 8).
8