


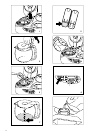
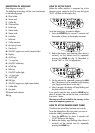


• WARNING: if the boiler is filled when it is hot (for
example when the water runs out while a
cappuccino is being made), only pour in the
amount of water shown above (170 gr.; 6 fl. oz.)
and NEVER try to fill the boiler to the MAX 6 OZ.
line (fig. 8) otherwise the milk will fail to froth
properly.
• Next close the boiler cap by turning it firmly in a
clockwise direction.
Note: for safety reasons it is not possible to
unscrew the boiler cap while the boiler is hot as
it turns without unscrewing; if you need to fill the
boiler you should wait until the water contained
in it has been completely used up or until the
boiler has cooled down.
Be sure to add water in the boiler only once it is
completely empty.
PREPARING THE MILK FOR CAPPUCCINOS
• Before dispensing milk, the boiler must be pre-
heated for 10 minutes. Therefore, press the
“CAPPUCCINO” button before preparing coffee;
doing so, the boiler will heat right up.
• Prepare the coffee as illustrated in the paragraph
headed “PREPARING THE COFFEE” and pour
about 2 fl. oz. (50-60 gr.) of coffee into each cup.
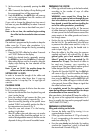
• To make a cappuccino, pour into the tank milk
which is neither boiling nor hot. With the tank
filled to the “MAX” line, 2 or 3 cappuccinos can
be made.
Never exceed the little mark which is
placed immediately above the word “MAX” (fig.
10) or the milk may continue to drip from the
pipe after the cappuccino has been prepared.
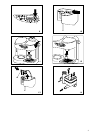
• Place the cup containing coffee under the milk
tank pipe, check that the milk tank is firmly
attached, wait for the “OK” pilot lamp (W) to
come on, the turn the steam knob at least a full
turn counter-clockwise. The “frothed” milk will
begin to trickle out of the milk tank pipe (fig. 11).
To avoid the milk splashing if small cups are used,
the anti-spray hood should be fitted on the milk
tank pipe (fig. 12).
• Fill the cup with the desired amount of frothed milk.
To ensure that the milk froths properly, always
close the steam knob and wait for the OK pilot
lamp to come on between one cappuccino and the
next.
As soon as the tank is empty and the machine
begins to puff, turn off the steam by turning the
steam knob in a clockwise direction.
• The following proportions are recommended in
order to obtain a perfect cappuccino: 1/3 coffee,
1/3 hot milk and 1/3 frothed milk.
Suggestion: to make a hotter cappuccino when
more than one cup is required, it is better to pour
one cup of coffee at a time before immediately
filling it with frothed milk, rather than pouring all
the cups of coffee at the same time first and then
filling them with frothed milk..
• Before switching the boiler off it is necessary to
clean the red emulsifier, so that it does not become
blocked by the milk when it solidifies: to do so, fill
the milk tank with a little water and turn the steam
knob. In this way the steam cleans all the holes
and emulsifier pipes and empties the internal
circuits of any traces of milk.
WARNING: to eliminate the “new” smell and above
all to ensure that the appliance functions properly, a
few coffee cycles should be completed without
coffee powder the first time the appliance is used,
and the steam boiler should be washed in the
following way: fill it with water, press the ‘ON/OFF’
cappuccino switch and after 5 minutes turn the
steam knob
and leave it on until all the steam has been used up
(about 15 minutes).
CLEANING AND MAINTENANCE
Before carrying out any cleaning or maintenance,
disconnect the appliance from the electrical power
supply by pulling out the plug.
Cleaning the milk frother
The milk frother must be cleaned each time after use;
proceed as follows:
• Remove the milk tank by pressing the lever
marked “PRESS” and pulling it upwards at the
same time; wash the tank with hot water.
• Remove the emulsifier (fig. 13) by pressing on the
lever (A) and pulling it upwards at the same time.
Remove the rubber mixer, especially wash and
clean with warm water the holes shown in fig. 14
(clean them using a needle). Check that the hole
marked with the arrow
B is not blocked (fig. 14).
Once they have been cleaned, all the pieces
must be reassembled correctly. Pay attention
that the rubber mixer is firmly pushed down and
the red emulsifier is pushed till you hear click. If
the appliance is not cleaned this way every time
it is used the milk may fail to froth properly or
may fail to be sucked up, or it may drip from the
milk tank pipe.
Warning
: to facilitate the cleaning of the milk tank
pipe, it is possible to use the pipe brush supplied.
9