


9
AFTER FRYING
When the cooking time runs out raise the basket and
check if the food has reached the required golden
colour. In the models fitted with a viewing window this
check can be carried out by looking through the win-
dow without opening the lid.
If you consider the cooking to be finished, switch off the
appliance by turning the thermostat knob to the
OFF position until you hear the click of the internal
switch.
Allow the excess oil to drip off by leaving the basket in
the deep fryer in the high position.
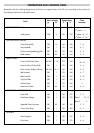
P.S. If the cooking needs to be done in two phases (e.g.
potatoes) raise the basket at the end of the first
phase and wait for the signal lamp to go off again.
Then immerse the basket back in the oil for a second
time (see enclosed tables).
FILTERING THE OIL OR FAT
We recommend that you carry out this procedure each
time you have finished frying as, especially when the
food has been breaded or floured, the food particles
tend to burn if they remain in the liquid thus causing
much quicker deterioration in the oil or fat.
Check that the oil is cool enough, waiting about 2
hours.
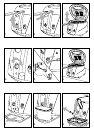
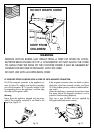
Bring the front part of the deep fryer to the edge
of the work surface, being careful that feet “M”
are always inside the area of the work surface
(fig. 6).
1. Pull tray “R” outwards (as in fig.7)
2. Place oil container “Q” without the “J” lid in the spe-
cial compartment (fig.8).
3. Remove the basket.
4. Open inspection door “Z” (as in fig.9).
5. Insert oil filter ”P” onto the container (fig.9)
6. Extract drainage pipe “S”, remove plug “L” while at
the same time squeezing the pipe between two fin-
gers to avoid the liquid coming out until it has been
positioned above the filter (see fig. 10).
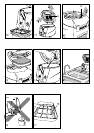
7. Flow the oil into the oil container “Q”. Pinch the oil
drainage pipe “S” between two fingers to regulate
the flow and avoid the oil leaking out of the open-
ings “Y” (fig. 17). These openings are provided to
prevent the oil overflowing from the filter tray if it
drains too fast or the filter is clogged. In this case,
filtering will not be optimum. If the oil is particular-
ly “dirty”, be careful to ensure that it does not over-
flow from the filter.
8. Reposition the pipe in its compartment after replac-
ing the plug and close the inspection door.
9. Put down the container, stopping it with lid “J” in
order to ensure better preservation of the oil for
future use.
10.Reposition the tray as at the beginning.
* In the event of fat being used, be careful not to let
it cool down too much or it will solidify.
REPLACING THE ODOUR-EATER FILTER
With time the odour-eater filters placed inside the lid
lose their effectiveness. A change of colour in the filter,
visible through hole “A” of fig.11 on the inside cover,
shows that the filter needs to be changed. To replace it,
remove plastic filter cover “F” (fig.12) by pressing latch
“H” in the direction of arrow 1, then raise it in the direc-
tion of arrow 2. Replace the filters.
P.S. The white filter must rest on the metal part (fig.13)
and the coloured area must face upwards (or towards
the black filter).
Reassemble the filter cover, being careful to insert the
front latchs correctly (as shown in fig.13).
Do not run the appliance with exhausted filters as this
could obstruct the steam causing bad odours.
CLEANING
Before cleaning, always remove the plug from the elec-
trical socket.
* Never immerse the deep fryer in water or hold it
under the tap. By getting inside the water would
cause short circuiting.
After having appropriately allowed the oil to cool for
about 2 hours, empty out the oil or fat as previously
described in the paragraph headed “filtering the oil or
fat”.
Remove the lid as shown in fig. 11.
Do not immerse the lid in water without having first
removed the filters.
To clean the bowl, proceed as follows:
•Wash the tank with hot water and washing up liq-
uid. Always use the oil drainage pipe to empty out
the water as shown in fig. 15. Then rinse and dry
carefully; remove any remaining water which has
collected in the oil drainage pipe.
* Never empty the deep fryer by tilting it or turning
it upside down (fig.16)
• In order to clean the inside of the drainage pipe, use
the pipe brush supplied (fig. 14).
•We advise regular cleaning of the basket, with care
being taken to eliminate any deposits which might
have accumulated in the basket’s wheel guide ring.
•Dry the outside of the deep fryer with a soft, damp
cloth in order to get rid of splashes and any little
dribbles of oil or condensation.
• Clean and dry the washer as well in order to avoid it
sticking to the bowl when the boiler is not in use. (To
open the lid in the event of sticking, you only need to
raise the lid by hand while at the same time keeping