


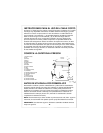

3) To reduce coffee sediment from forming inside the base of the urn, place
coffee filter in the basket.
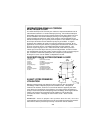
4) Place the basket on the tube and cover with spreader. By holding the top end of
the tube, place into the coffee urn so the bottom of the tube is properly
positioned in the center of the percolation well. If improperly positioned, coffee
may not percolate. Push and turn to lock the cover of the coffee urn into place.
5) Never plug in the coffee urn without water or liquid inside. Plug the
power cord into a standard 120 Volt AC wall outlet. The brewing begins within
seconds. You can view the percolation through the glass knob and monitor the
amount of coffee through the level indicator.
6) The thermostat ranges from 150 - 200°F and may be adjusted according to your
desired temperature before, during and after (keep warm) the brewing process.
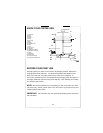
1) Remove the cover. Take out the basket, spreader and tube assembly. Fill your
coffee urn with cold water corresponding to the desired cups of coffee you
will be making. Cup level markings are located on the inside of the coffee urn.
NOTE: The coffee urn makes 20-50 cups. DO NOT OVERFILL OR
UNDERFILL THE URN. Fill according to the markings on the inside of urn for
number of cups desired. Use cold tap water.
2) Moisten the coffee basket to help keep small particles from sifting through. Add
desired amount of regular or percolator grind coffee to basket using a standard
tablespoon or measuring cup. We recommend percolator grind coffee for best
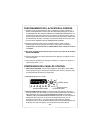
results. The following chart suggests amount of coffee to use for medium brew;
amounts can be varied to suit personal taste and particular types of coffee:
NOTE: 1 cup brewed coffee = 5 fluid ounces
Cups To
Be Brewed
20
30
40
50
Amt. of Ground Coffee to Use -
Tablespoons
18 - 21
28 - 31
38 - 41
48 - 50
Amt. of Ground Coffee to Use -
Measuring Cups
1
1½
2
2½
OPERATING YOUR COFFEE URN
-4-