


Open
Installation Safety PrecautionsCare and Cleaning
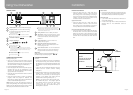
Electrical Connection
This appliance should be properly grounded for
Ÿ
your safety. The power cord of this appliance is
equipped with a three-prong plug which mates
with standard three prong wall outlets to minimise
the possibility of electrical shock.
DO NOT UNDER ANY CIRCUMSTANCES CUT
Ÿ
OR REMOVE THE EARTHING CONNECTION
FROM THE POWER CORD SUPPLIED. FOR
PERSONAL SAFETY, THIS APPLIANCE MUST BE
PROPERLY GROUNDED.
Please look at the rating label to know the rating
Ÿ
voltage and connect the dishwasher to the
appropriate power supply. Use the required fuse
10 amp, time delay fuse or circuit breaker
recommended and provide separate circuit
serving only this appliance.
Ensure the voltage and frequency of the power
Ÿ
being used corresponds to those on the rating
plate. Only insert the plug into an electrical socket
which is earthed properly. If the electrical socket to
which the appliance must be connected is not
appropriate for the plug , replace the socket, rather
than using a adaptors or the like as they could
cause overheating and burns.
The cord should be secured behind the appliance
Ÿ
and not left exposed or dangling to prevent
accidental injury.
The appliance should always be plugged into its
Ÿ
own individual electrical outlet which has a voltage
rating that matches the rating label on the
appliance. This provides the best performance and
also prevent overloading house wiring circuits that
could cause a fire hazard from overheated. Never
unplug the appliance by pulling the power cord.
Always grip the plug firmly and pull straight out
from the receptacle. Repair or replace immediately
all power cords that have become frayed or
otherwise damaged. Do not use a cord that shows
cracks or abrasion damage along its length or at
either end. When moving the appliance, be careful
not to damage the power cord.
Extension Cord
WARNING: DO NOT USE AN EXTENSION CORD
Ÿ
OR AN ADAPTER PLUG WITH THIS APPLIANCE.
Grounding Instructions
This appliance must be earthed. In the event of a
Ÿ
malfunction or breakdown, earthing will reduce the
risk of electric shock by providing a path of least
resistance for the electric current. This appliance
is equipped with a cord having an equipment-
earthing conductor and an earthing plug. The plug
must be plugged into an appropriate outlet that is
installed and earthed in accordance with all local
standards and requirements.
WARNING
Improper connection of the equipment earthing
Ÿ
conductor can result in the risk of an electric shock.
Check with a qualified electrician or service
Ÿ
representative if you are in doubt whether the
appliance is properly earthed.
Do not modify the plug provided with the
Ÿ
appliance. If the plug does not fit properly to the
outlet, please have a qualified electrician install a
proper outlet.
Page 7Page 22
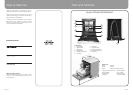
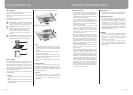
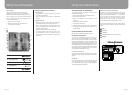
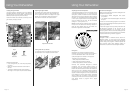
Filtering System
The filter prevents larger remnants of food or other
objects from getting inside the pump.
The residue may block the filter, in this case they must
be removed.
The filter system consists of a coarse filter, a flat (Main
filter) and a microfilter (Fine filter).
3
2
1
MAIN FILTER: Food and soil particles trapped
in this filter are pulverized by a special jet on the
lower spray arm and washed down the drain.
COARSE FILTER: Larger items, such as
pieces of bones or glass, that could clog the
drain are trapped in the coarse filter. To
remove an item caught in this filter, gently
squeeze the taps on the top of this filter and
lift it out.
FINE FILTER: This filter holds soil and food
residues in the sump area and prevents it from
being redeposit on the dishes during a cycle.
1
2
3
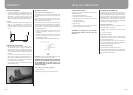
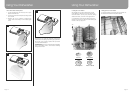
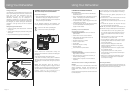
Filter Assembly
The filter efficiently removes food particles from the
wash water, allowing it to be recycled during the cycle.
For best performance and results, the filter must be
cleaned regularly. For this reason, it is a good idea to
remove the larger food particles trapped in the filter
after each wash cycle by rinsing the semicircular filter
and cup under running water.
To remove the filter device, pull the cup handle in the
upward direction.
WARNING!
The dishwasher must never be used without the
Ÿ
filters.
Improper replacement of the filter may reduce the
Ÿ
performance level of the appliance and damage
dishes and utensils.
1
2
STEP 1: Turn the filter in anti-clockwise direction.
STEP 2: Lift the filter assembly up.
NOTES:
When following this procedure from step 1 to step
Ÿ
2, the filter system will be removed; when following
it from Step 2 to Step 1, the filter system will be
installed.
Inspect the filters for blocking after every time the
Ÿ
dishwasher has been used.
By unscrewing the coarse filter, you can remove the
Ÿ
filter system. Remove any food remnants and clean
the filters under running water.
The entire filter assembly should be cleaned once a
Ÿ
week.
Cleaning the Filter
To clean the coarse filter and the fine filter, use a
cleaning brush. Reassemble the filter parts as shown
in the figures on the last page and reinsert the entire
assembly in the dishwasher, positioning it in its seat
and pressing downwards.
WARNING!
When cleaning the filters, do not knock on them.
Ÿ
Otherwise, the filters could be contorted and the
performance of the dishwasher could be
decreased.