


6
®
OPEN A SEALED BAG
Cut bag straight across with scissors, just inside the seal.
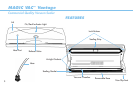
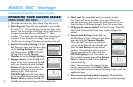
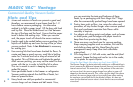
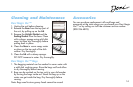
USING THE JAR ATTACHMENT
NOTE: The following instructions are for use with the wide
or small mouth jar attachment (not included).
1. Fill jar. Make sure that jar is not filled to the top. Leave
at least 1” space at the top for the vacuum to operate
properly. Note: Be sure to use the wide mouth canning
jars with the wide mouth attachments, and small mouth
canning jars with the small mouth attachments.
2. Placement of jar lid. Make sure that the rim of the jar
and the seal of the lid are clean and free of food
particles before placing lid on container. Note: DO NOT
use the metal ring when vacuum sealing the jar. Once
the jar is vacuum packed, place the ring on the jar and
tighten to ensure a secure seal.
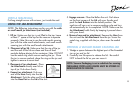
3.
Placement of jar attachment. Place
Jar Attachment directly over lid on
top of jar. Push down firmly.
4. Connect jar attachment. Push one
end of the Hose firmly into the Jar
Attachment. Push the other end firmly
into the Hose Port on the Lid of the unit.
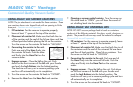
5. Engage vacuum. Close the Lid on the unit. Push down
on the front corners of the Lid with your thumbs and
push the Lock Buttons into the locked position. The
machine will carry out a vacuum packing cycle and turn
off automatically on its completion. NOTE: Make sure the
Jar Attachment holds firmly by keeping it pressed down
with your hand.
6. Remove hose and jar attachment. Remove the Hose from
the unit and the Jar Attachment from the jar. Screw the
metal ring, supplied with the jar, down over the sealed
lid.
OPENING A VACUUM SEALED CANNING JAR
1. Wedge a spoon between the highest part of the threaded
rim on jar and jar lid.
2. Carefully turn the spoon to release the lid. Be careful
NOT to bend the lid so you can reuse it.
NOTE: Vacuum Packaging is not a substitute for canning.
PERISHABLE FOODS AND LIQUIDS MUST BE STORED IN
REFRIGERATOR OR FREEZER.