


www.desatech.com
119668-01A8
STORAGE
When not in use, unplug the unit from the power
supply and store in dry, dust free location.
TECHNICAL SERVICE
You may have further questions about your elec-
tric stove. If so, contact DESA Heating Products’
Technical Service Department at 1-866-672-6040.
When calling please have your model and serial
numbers of your heater ready.
You can also visit DESA Heating Products’ techni-
cal services web site at www.desatech.com.
REPLACEMENT PARTS
Note: Use only original replacement parts. This
will protect your warranty coverage for parts
replaced under warranty.
PARTS UNDER WARRANTY
Contact authorized dealers of this product. If
they can’t supply original replacement part(s),
call DESA Heating Products’ Technical Service
Department at 1-866-672-6040.
When calling DESA Heating Products, have ready
• your name
• your address
• model and serial numbers of your heater
• how heater was malfunctioning
• purchase date
Usually, we will ask you to return the part to the
factory.
PARTS NOT UNDER WARRANTY
Contact authorized dealers of this product. If they
can’t supply original replacement part(s), call
DESA Heating Products at 1-866-672-6040 for
referral information.
When calling DESA Heating Products, have ready
• model number of your heater
• the replacement part number
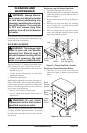
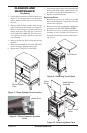
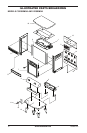
4. Slide heater assembly out back of stove and
set aside (see Figure 10, page 7).
5. Slide glass up through top of stove.
6. Slide new glass into place between glass
retainers.
7. Replace heater/blower assembly using screws
removed in step 3, page 7.
8. Replace back control panel using screws
removed in step 2, page 7.
9. Slide top of stove back into slots.
Replacing Log
1. Follow steps 1 through 4 under Replacing
Glass, page 7, to allow access to log.
2. Carefully pull up on log to remove from stove
cavity.
3. Place replacement log into stove.
4. Follow steps 5 through 8 under Replacing
Glass to complete this procedure.
CLEANING FRONT PANEL GLASS
WARNING: When cleaning
unit, the power supply should
be disconnected and the unit
should be cool.
Over time the front glass panel may become dirty or
dusty. Dust can be removed by lightly rubbing the
glass surface with a clean, lint free cloth or paper
towel. To remove ngerprints or other marks, use
a damp cloth with a good quality household glass
cleaner. The front glass panel should be completely
dried with a clean, lint free cloth or paper towel.
CAUTION: Do not use abra-
sive cleaners on glass panel. Do
not spray liquids directly onto
any surface of the unit.
WARNING: An authorized
service representative should
perform any other servicing.
CLEANING AND
MAINTENANCE
Continued