


3
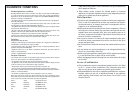
Contents
Safety . . . . . . . . . . . . . . . . . . . . . . . . . . . . . . . . . . . . . . . . . . . . . . . . . .4
Disposal . . . . . . . . . . . . . . . . . . . . . . . . . . . . . . . . . . . . . . . . . . . . . . . .6
Appliance Packaging Information . . . . . . . . . . . . . . . . . . . . . . . . . . . . . . .6
Disposal of old Appliances . . . . . . . . . . . . . . . . . . . . . . . . . . . . . . . . . . . .6
Remove transport safeguard . . . . . . . . . . . . . . . . . . . . . . . . . . . . . . . .6
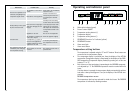
Operating and indicator panel . . . . . . . . . . . . . . . . . . . . . . . . . . . . . .7
Starting up -setting the temperature . . . . . . . . . . . . . . . . . . . . . . . .8
Freezing and storing frozen food . . . . . . . . . . . . . . . . . . . . . . . . . . .9
Preparation of Ice Cubes . . . . . . . . . . . . . . . . . . . . . . . . . . . . . . . . . .10
Storage goods symbols/ Freezing Calendar . . . . . . . . . . . . . . . . . . .11
Defrosting . . . . . . . . . . . . . . . . . . . . . . . . . . . . . . . . . . . . . . . . . . . . . .11
Switching off the appliance . . . . . . . . . . . . . . . . . . . . . . . . . . . . . . .11
Cleaning and Care . . . . . . . . . . . . . . . . . . . . . . . . . . . . . . . . . . . . . . .11
Energy Saving Tips . . . . . . . . . . . . . . . . . . . . . . . . . . . . . . . . . . . . . . .12
What to do if . . . . . . . . . . . . . . . . . . . . . . . . . . . . . . . . . . . . . . . . . .13
Correcting Malfunctions . . . . . . . . . . . . . . . . . . . . . . . . . . . . . . . . . . . . . .13
Service and Spare Parts . . . . . . . . . . . . . . . . . . . . . . . . . . . . . . . . . . .15
Customer Care Department . . . . . . . . . . . . . . . . . . . . . . . . . . . . . . .15
Guarantee Conditions . . . . . . . . . . . . . . . . . . . . . . . . . . . . . . . . . . . .16
Installation . . . . . . . . . . . . . . . . . . . . . . . . . . . . . . . . . . . . . . . . . . . . .17
Positioning . . . . . . . . . . . . . . . . . . . . . . . . . . . . . . . . . . . . . . . . . . . . .18
Your refrigerator needs air . . . . . . . . . . . . . . . . . . . . . . . . . . . . . . . . . . . .18
Reversing the door . . . . . . . . . . . . . . . . . . . . . . . . . . . . . . . . . . . . . . . . . .18
Housing dimensions . . . . . . . . . . . . . . . . . . . . . . . . . . . . . . . . . . . . . . . . .19
Regulations, Standards, Guidelines . . . . . . . . . . . . . . . . . . . . . . . . .19
18
Positioning
This appliance should only be installed at a location where the ambient tem-
perature corresponds to the climate classification indicated on the rating
plate, which is located at the left on the inside of the appliance.
The following table shows which ambient temperature is correct for each
climate classification:
SN +10°C to + 32°C
N +16°C to + 32°C
ST +18°C to + 38°C
T +18°C to + 43°C
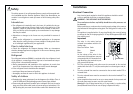
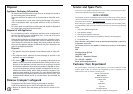
Your appliance needs air
For safety reasons, minimum ventila-
tion must be as shown Fig.
Attention: keep ventilation openings
clear of obstruction;
50 mm
min.
200 cm
2
200 cm
2
min.
D567
Reversing the door
The side the door opens can be changed from the right side (factory adjust-
ment) to the left side, if the installation site requires.
Warning! When changing the side the door opens, the appliance must not
be connected to the mains. Remove plug from the mains beforehand.