10
10
This appliance is intended for industrial use, and must only
be used by trained staff.
1. INTRODUCTION
The appliance must be used exclusively for its intended use, i.e.
for the cooking of foodstuffs such as pasta, rice etc. in water. Any
other use is therefore to be considered improper.
• Our appliances have been designed and optimised by means
of laboratory tests to guarantee high levels of performance and
efficiency. Avoid using the appliance under no-load conditions.
Also, when possible, pre-heat the appliance before use.
Before using the appliance, make sure that the basin, baskets
and water pre-heater have been cleaned of any residue of
industrial protective grease by carrying out a cooking cycle using
a neutral detergent in place of food.
2. USE
• Switch on the power at the mains and open the water cut-off cock.
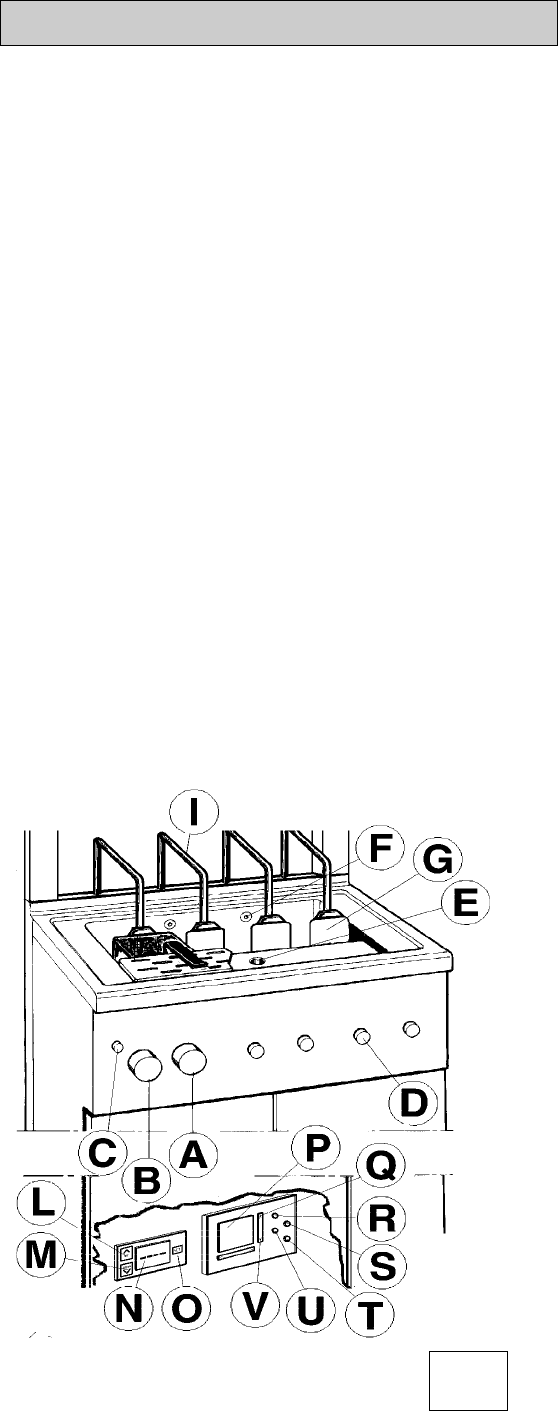
• Close the water drainage valve "R" fig. 3 (lever positioned
horizontally).
2.1. FILLING THE BASIN WITH WATER (fig. 4)
• The control knob "B" has 3 operational positions:
0 Power off (green indicator light "C" off)
1 Rapid water filling
2 - Water filling stop
- Basin heater enabled
3 Slow water filling
• Fill the basin by turning the control knob "B" to position "1".
• To interrupt the water filling process turn knob "B" to position "2".
2.2. HEATING THE WATER IN THE BASIN (fig. 4)
The control knob "A" has the following positions:
V Basin heater off
1 to 5 Low to medium power level
(stand by mode maintaining the water basin at
about 90°C - pos.5 -)
6 to 8 Medium to high power level (cooking positions)
I Maximum power (reaching the temperature or
regaining the boiling point)
Important: Never insert the heating elements or leave them
inserted if the water level in the basin is lower than the
reference mark on the right-hand wall of the basin.
Failure to comply with this safety standard can cause
damage to the basin and internal components of the
appliance.
• Turn knob "A" to the position "I" (temperature reaching stage)
2.3. COOKING
When the water contained in the basin is at boiling point:
• Add salt (it is recommended that only refined salt be used in
order to avoid corrosive deposits on the basin bottom. If the only
type available is the coarse grain type then this must be first dis-
solved in a separate container).
• Introduce the baskets containing the food to be cooked into the
basin.
The overflow pipe "E" (fig.4) guarantees the control of the maxi-
mum water filling level and allows the starch produced during
cooking to be removed.
• Turn knob "A" to a higher or lower setting depending on the type
and quantity of the food that is to be cooked.
2.4. SWITCHING OFF (fig. 4)
• To switch off the heating elements rotate knob "A" to the position "V".
• To turn off the power supply turn the knob "B" to the position "0".
2.5. TEMPERATURE SETTING (fig. 4)
Press shortly down “A” (SET).
Press down “B” for increasing (up).
Press down “C” for decreasing (down).
Value shown by display “D” will be automatically saved after few
seconds.
2.6. TIME PROGRAMMING (fig. 4)
Computer can store up to 4 programs.
Press down “F”/”G”: program 1 will blink on display “E” (further left side
lifter).
Press down “I” (+) to increase the time.
Press down “L” (-) to decrease the time.
Press down “M” (OK) to store the program in memory.
Press down once “F”/”G” for switching the programming mode to
the next program (program 2) and so on till to the right side lifter.
To gain direct access to the program you need to set (1, 2, 3, 4)
press down the push button "Q"/"V" as many times as needed.
Press down OK for storing each new memorization.
Press down “H” (ESC) to escape from programming mode
without saving.
Speedy of time increasing/decreasing will be higher if holding on
“I”/”L” (+/-).
4
IV. INSTRUCTIONS FOR USE


