


5
Daily Operation
• Containers with flammable gases or liquids can leak at low temperatures.
There is a risk of an explosion! Do not store any containers with flamma-
ble materials such as, spray cans, fire extinguisher refill cartridges etc in
the refrigerator/freezer.
• Bottles and cans must not be placed in the freezer compartment. They can
burst when the contents freeze, high carbonate content drinks can even
explode! Never store lemonade, juices, beer, wine, sparkling wine etc. in
the freezer compartment.
• Ice cream or ice cubes can cause “frost/freezer” burns if consumed strai-
ght from the freezer.
• Do not touch frozen food with wet hands. Your hands could stick to the
food.
• Do not operate any electrical appliances in the refrigerator/freezer (e.g.
electric ice cream makers, mixers etc.).
• Before cleaning the appliance, always switch off the appliance and
disconnect from the electricity supply.
• When unplugging always pull the plug from the mains socket, do not pull
on the cable.
Service
• Under no circumstances should you attempt to repair the appliance your-
self. Repairs carried out by inexperienced persons may cause injury or
serious malfunctioning. Contact your local AEG Service Force Centre.
Disposal
Appliance Packaging Information
All materials are environmentally sound.
The plastics can be recycled and are identified as follows:
>PE< for polyethylene, e.g. the outer covering and the bags in the interior.
>PS< for polystyrene foam, e.g. the pads, which are all free of chlorofluo-
rocarbon.
The carton parts are made from recycled paper and should be disposed of
at a waste-paper recycling collection location.
20
I
P
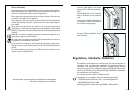
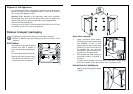
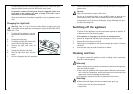
Fasten the appliance with 4 screws
provided in the kit included with the
appliance. (I = 3,5 x 13) - (P = 3,5 x
22).
Fit the appliance in the niche by
making sure that it stands against
the interior surface of the unit on
the side where the door hinges of
the appliances are fitted. Insert the
appliance until the upper strip butts
up against the unit (1) and make
sure that the lower hinge is in line
with the surface of the unit (2).
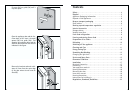
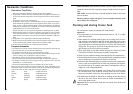
13mm
D740
Ø 2,5
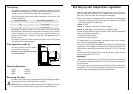
An additional midpoint location
bracket may be fitted to the appli-
ance (as shown) to assist retention of
the housing side wall.
Drill the unit using a ³ 2,5 mm drill
(10 mm max. penetration.
Fix the square fitting (1) to the appli-
ance.
D023
1
2