


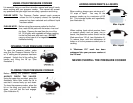


Disassembling the Valves:
Pressure Selector Valve: Pulling up on tab (1) allows the valve
cover to snap off. Remove the valve assembly and rinse with
hot, soapy water. Allow to dry and then reassemble. Do
NOT
disassemble the stem or bottom portion of the valve as
it is factory sealed.
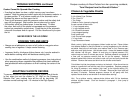
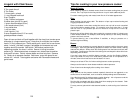
Automatic Valve: Turn the lid over
making sure that it is in the locked
position. Place the vapor key
supplied with your pressure
cooker into the slots on the valve
and turn counterclockwise.
Remove the valve parts and
rinse in hot, soapy water.
Reassemble by reversing this
operation.
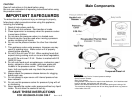
1 - Vapor Key
2 - Aluminum Cap
3 - O-Ring
4 - Safety Valve Stem &
Spring Assembly
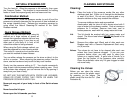
Storing: After using the pressure cooker, store with lid upside-
down over the pot body. Do NOT store the pressure cooker
with the lid closed to avoid compressing the seal for long
periods of time.
10
9
10
TROUBLE SHOOTING
Cooker Cannot be Closed
• You have tried to put the lid on with the contents already boiling.
• The seal may be too dry and needs to be oiled slightly.
The Pressure Selector Does Not Rise
• Check the time that you started heating the pot. If the pot is full
and the contents are cold, it can take up to 20 minutes to come to
full pressure.
• Check to see that the pressure selector is not at “0”.
If the above two points are not the cause of the problem, stop
cooking immediately. Cool the pressure cooker down completely
before opening and check the following:
• There may not be enough liquid in the pressure cooker. You will need
at least 1 1/2 cups of liquid in order to reach full pressure. Add the
recommended amount of liquid.
• The unit may have been overfilled and there is not sufficient room for
the air to circulate and create pressure. Remove some of the ingredients
that you are cooking.
• The pressure cooker is not closed properly. Repeat the closing
operation. Check to see if the seal is dirty or damaged. Remove and
clean the seal. Be sure to oil it after washing. Replace the seal with a
new one if necessary.
• The automatic valve is dirty or blocked. Dismantle the valve, clean and
reassemble it following the maintenance instructions.
• The o-ring of the valve nut is damaged and should be replaced.
• The safety valve is not working and should be replaced.
Small Amount of Steam Escaping From the Automatic Valve
• This is not a problem because the pressure indicator is relieving
any excess pressure. Water droplets may also appear.
Constant Amount of Steam Escaping From the Automatic Valve
• The heat is too high. Turn down the heat.
• The automatic valve is dirty. Follow the cleaning instructions .
• The safety valve is not working and should be replaced.
11