


4
Installation instructions
Important!
An additional person will be required for Step 11 of this
operation, or, a simple support frame made to the correct
dimensions will aid assembly of the island canopy.
1
Before commencement, unpack the island canopy
and check that it functions correctly.
2
Use a plumb line to mark the centre of the cooking
surface on the ceiling.
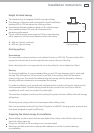
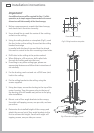
3
Using the ceiling bracket as a template (Fig.3), mark
the four holes on the ceiling. Ensure that the ceiling
bracket front edge
is parallel with the bench top and that the plumb
line mark is central to the four mounting screw holes.
4
Drill holes in the ceiling at the points marked.
a
When fitting to a 50 mm truss, drill a pilot hole
through the ceiling and into the truss.
b
If securing to any other ceiling type, please use
appropriate fasteners and follow their instructions of
use carefully.
5
For the ducting, mark out and cut a Ø160 mm (min)
hole in the ceiling.
6
Fix the ceiling bracket to the ceiling using the
screws supplied.
7
Using duct tape, secure the ducting to the top of the
motor housing. Tape the power plug to the top of
the ducting, this will enable easy access to the plug
after installation.
8
Mount a set of four angle brackets to the canopy.
Use eight self tapping screws, one per side, and one
per corner.
9
Determine the installed height of the canopy and
attach the second set of four angle brackets to the
first to achieve this height. Secure with eight self
tapping screws, one per side per corner.
Front face of canopy
Fig.3 Ceiling bracket as template
4
5
2
3
9
8
2
7
10
6
Fig.4 Plan view of support frame