


6
Cleaning and maintenance
Caution!
Never use abrasive or oil based liquid cleaners.
General maintenance
The manufacturer is not liable for any damage caused by not following these instructions.
The island canopy should be cleaned regularly using warm water with soap or mild liquid
detergents. This ensures that no build-up of grease occurs as these deposits are corrosive.
Do not use abrasives or harsh detergents/cleaning fluids.
Note: in areas of high humidity and coastal environments cleaning should be carried out frequently.
Aluminium filters
The grease filters must be periodically cleaned (at least every two months).
Remove the grease filters and wash them either by hand using hot soapy water or place them in
the dishwasher using mild detergent. Badly smoked filters may be cleaned with “cookware cleaners”.
Note: some discolouration of the frame may occur.
Charcoal filters
Charcoal filters are designed to remove grease and odours from cooking vapours, prior to the
cleansed air re-entering the kitchen (when the island canopy is in recirculating mode). Charcoal
filters are disposable items and it is recommended that these should be replaced every three to
six months depending on use.
Note:
Fully saturated charcoal filters can become a barrier to air movement, impeding the island
canopy’s performance.
In the event of fire, fully grease laden filters could be flammable and therefore regular
replacement is recommended.
In ducted installations, conventional aluminium filters are recommended.
For replacement charcoal filters, ducting accessories,
spare parts and service, please contact your local
supplier or Fisher & Paykel Customer Care Centre.
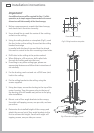
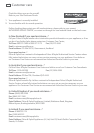
Light bulb replacement
(Halogen bulb 12 Volts/20 Watt)
1
Switch off the power to the island canopy.
2
Use a small bladed screwdriver to prise off the light cover,
taking care not to damage the surrounding material.
3
Remove the defective bulb from the canopy hood.
4
Replace with a new bulb using a cloth. Do not touch the
bulb with fingers as this will shorten the life of the bulb.
5
Snap the cover back into place.
Fig.6 Replacing a light bulb