


5
Choice of location
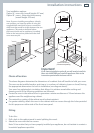
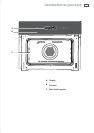
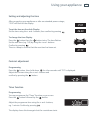
The above diagrams determine the dimensions of a cabinet that will be able to hold your oven.
The oven can be installed under a work top or in a column of cabinetry (open or closed) having
the appropriate dimensions for built-in installation (see diagram above).
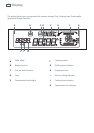
Your oven has optimised air circulation that allows it to achieve remarkable cooking and
cleaning results if the following guidelines are followed :
Centre the oven in the cabinet so as to guarantee a minimum distance of 10mm between the
appliance and the neighbouring cabinet.
The material or coating of the cabinet must be heat-resistant.
For greater stability, attach the oven in the cabinet with two screws through the holes provided
for this purpose on either side of the front inner panel.
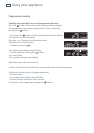
Fitting
To do this :
1
Drill a hole in the cabinet panel to avoid splitting the wood.
2
Attach the oven with the two screws.
Note: To be certain that you have properly installed your appliance, do not hesitate to contact a
household appliance specialist.
Installation instructions
550
595
547
23
378
560
550
min.
560
550 min.
457
(option 'A')
478
(option 'B')
445
20
50
10
50
450
(option 'A')
470
(option 'B')
Lower trim
(optional accessory,
purchased separately)
450
(option 'A')
470
(option 'B')
Two installation options:
Option ‘A’ - oven only (overall height 457 mm)
Option ‘B’ - oven + lower trim kit accessory
(overall height 478 mm)
Note: If you are installing an appliance directly
over another, you have the option of using the
supplied black metal shelf cover to conceal the
shelf front that would be visible between the two
appliances. This needs to be fitted before
the lower trim kit and/or appliance is installed.
Refer to the instructions packed with the shelf
cover accessory kit.
Important!
If you choose Installation option B, you will need to install the
lower trim kit BEFORE you install the appliance. Refer to the
instructions packed with the lower trim kit.