


4
9
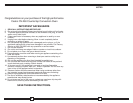
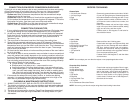
Top Hook
Hinge Arm
(1)
(2)
1) Tilt door up at about 45
o
angle until the Top Hook
on the Hinge Arm is lower than the Top Hook
Roller, 2) then pull out of the Hinge Slots.
Step 3
(side view)
Oven Door Removal Instructions
(To attach the door, reverse the directions,starting with Step 3)
Hinge Lock- in
up/locked position)
Top Hook Roller
Hinge lock - in
down/unlocked position
Step 1
(side view)
Open the door fully.
Door (fully opened; does not open flat)
Side of
Oven
Bottom
Hook
Step 2
(side view)
Rotate the Hinge Lock
to up position.
Hinge Lock- must be
in up/locked position)
Bottom
Hook
Side of
Oven
Side of
Oven
PLEASE NOTE: Hinge Locks may become jostled into the unlocked position by rough handling of
the carton during shipping, causing the door to be unhinged from the oven when the carton is opened.
If this occurs, follow the directions for attaching the door.
IMPORTANT NOTES
1. Carefully remove the protective film from the external stainless steel
walls before using oven for the first time. If any glue residue should
remain, remove it with a suitable solvent recommended for stainless.
2. Your unit is equipped with a grounded, current-carrying plug. This plug
will fit into any 3 pronged outlet. This is a SAFETY feature.
3. Electrical connection must be a proper outlet for the 3 pronged cord.
Before connecting power, make sure the voltage and frequency
correspond to the data plate on the oven (120 volts/60hz.) , and that
your electrical circuit can handle the 12.5 Amps used by the oven in
addition to any other appliances operating on the same circuit.
4. A short power cord is provided to reduce the hazards resulting from
accidents such as tripping, entanglement, etc.
5. This oven is equipped with a manually resettable
thermal breaker for protection against overheating. It
completely deactivates the oven if there is an intervention.
To reset this device, remove the black cap positioned to
the bottom of the back of the oven, push the reset button,
and replace the black cap. This oven uses 12.5 amps.
If the thermal breaker shuts your oven off, before
turning your oven back on, be sure to check your
entire circuit to verify that the total amps being drawn
by all the appliances, lights, etc. on that circuit do not
exceed the amps available on that circuit.
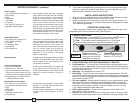
Reset button
CAP
Reset button
ON OFF
Figure 1
ROASTING CHART
VARIETY WEIGHT APPROX. INTERNAL TEMP.
OF MEAT / IN ROASTING AT END OF
OVEN TEMP. CUT POUNDS TIME* ROASTING TIME
Standing Rib 3-6 24-28 min/lb. med 140°
29-34 min/lb. well 160°
14-18 min/lb. rare 130°
Standing Rib 7-10 19-23 min/lb. med l40°
24-29 min/lb. well 160°
BEEF ROAST Rib Roast, 17-23 min/lb. rare 130°
300° F boned 3-6 24-30 min/lb. med 140°
and tied 31-37 min/lb. well 160°
14-17 min/lb. rare 130°
Sirloin Tip, tied 4-7 18-21 min/lb. med 140°
22-25 min/lb. well 150°-160°
15-18 min/lb. rare 130°
Eye Round 3-6 19-23 min/lb. med 140°
24-28 min/lb. well 160°
Loin, bone-in 3-7 26-33 min/lb. well 170°
FRESH PORK Loin, boned and tied 3-5 20-30 min/lb well 170°
300° F Picnic Shoulder 5-8 29-34 min/lb. well 170°
Fresh Ham 3-7 26-33 min/lb. well 170°
LAMB-300° F Leg of Lamb 3-8 26-25 min/lb. med 140°-150°
25-35 min/lb. well 170°
VEAL - 300° F Veal Shoulder, rolled 4-7 30-45 min/lb well 170°
Roasting Chicken 3 ½ - 6 1-1 ¾ hrs 180°-185°
POULTRY - 325° F Roasting Chicken, stuffed 3 ½ - 6 1 ¼ -2 hrs 180°-185°
Cornish Game Hens 1-1 ½ 1 hr 180°-185°
POULTRY-300° F Turkey 6-10 1 ½ -2 hrs 180°-185°
Turkey, stuffed 6-10 1 ¾ - 2 ½ hrs 180°-185°
POULTRY - 400° F Duckling 4-6 1 ½ -1 ¾ hrs 180°-185°
Duckling, stuffed 4-6 1 ¾ hrs 180°-185°
*Note: Meat should be at refrigerator temperature.
INTERNAL TEMPERATURE CHART FOR MEATS
(Use as general guidelines)
Rare 130
° F
Medium Rare 135
° F
Medium 140
° F
Medium Well 150
° F
Well 160
° - 185°F