


5
english
GB
Information
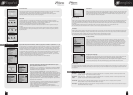
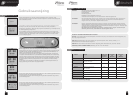
Whilst in the program selection screen press and hold the dial for 2 seconds, the information screen
will be displayed. Rotate the dial until 'INFORMATION' is highlighted. Press and release the dial to
display the screen showing the last run cycle. The information relates to date, program run, start
time, start temperature and end temperature.
HACCP settings
Whilst in the program selection screen press and hold the dial for 2 seconds, the information screen will be displayed. Rotate the dial
until 'HACCP SETTINGS' is highlighted. Press and release the dial to access the HACCP option screen. Press and release the dial to
move to the selection screen for long or short reports, rotate the dial to select which option, once selected press and release the dial
to confirm.
Press and release the dial to move to the selection screen for the print sample, select 3 or 5 minute selection rate.
On completion press and hold the dial for 2 seconds to return to the program selection screen.
Print Data
Whilst in the program selection screen press and hold the dial for 2 seconds, the information screen will be displayed. Rotate the dial
until 'PRINT DATA' is highlighted. If using a hand held printer switch the printer on now. Point the printer at the infra red download
sensor (optional), located in display area, press and release the dial to download the print data.
On completion press and hold the dial for 2 seconds to return to the program selection screen.
Screen Saver
The screen saver screen is displayed if the machine is not used for 20 minutes, providing power is connected to it. It shows a series of
'Z' indicating sleep mode. Pressing and releasing the dial or opening the door will awaken the unit, the program selection screen will
be displayed.
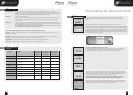
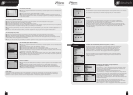
Set time and date
Whilst in the program selection screen press and hold the dial for 2 seconds, the information
screen will be displayed, top left. Rotate the dial until 'SET TIME/DATE' is highlighted. Press and
release the dial to access the service screen, below left. Press and release the dial to move to the
displayed time in hours and minutes, rotate the dial to alter the time, once the correct time has
been achieved press and release the dial to move to 'DAY'. If it is necessary to change the day,
month and year change the settings using the same procedure for setting the time.
On completion press and hold the dial for 2 seconds to return to the program selection screen.
Changing Text Language
Whilst in the program selection screen press and hold the dial for 2 seconds, the information screen will
be displayed continue pressing the dial for a further 2 seconds to display the 'SERVICE MENU'.
LANGUAGE will be highlighted, press and release the dial, 'ENG' (English) will be highlighted. Rotate the
dial to change the language. Select the preferred language, press and release the dial to confirm.
Alarms and Warnings
8
Air Probe: If this alarm occurs it will remain in the program selected until it is completed, however no further operation will be
possible. Call your Foster Authorised Service Company.
Evaporator If this alarm occurs it will remain in the program selected until it is completed, however no further operation will be
Probe: possible. Call your Foster Authorised Service Company.
Food Probe: If this alarm occurs it will automatically change to a timed program until it is completed, further operation
will be possible. Call your Foster Authorised Service Company.
Door Open: The display will continue to show the alarm message until the door is closed. If this does not cancel the alarm call your
Foster Authorised Service Company.
32
Español
E
Pre-enfriamiento
Este programa se utiliza para la pre-refrigeración del armario antes del primer ciclo. Esto se realiza
con el abatidor vacío y es un tiempo corto basado en un programa de 20 minutos.
El programa es seleccionado girando el dial hasta que la pantalla muestre dicho programa.
Entonces presionar y soltar para que comience el programa.
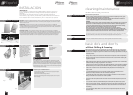
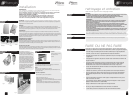
Descarche
La descongelación no es necesaria normalmente pero si hay hielo acumulado en la bobina
dentro del armario, se puede seleccionar un manual de descongelación. Girar el indicador hasta
la pantalla de descongelación, mostrado en la figura debajo a la izquierda.
Presionar y soltar el indicador para comenzar la descongelación.
Durante la descongelación las pantallas mostradas serán alternas entre la figura del centro y la
derecha.
La descongelación durará 20 minutos y cuando termine sonará la alarma. Presionar el indicador
para parar la alarma o sino esperar hasta que termine la alarma, la alarma se parará y volverá a
la pantalla previa.
Ajustes de Temperatura de Refrigeración/Mantenimiento. (sólo
para programas profesional 1, 2 ó 3)
Profesional 1, 2 y 3, si se configuran, son programas que pueden ser utilizados
para adaptar el tiempo de refrigeración y la temperatura para adecuarlo a las
necesidades de un producto específico.
Ajustar el “TIEMPO DE REFRIGERACIÓN” como se indica arriba. Con el
“TIEMPO DE REFRIGERACIÓN” resaltado, abajo izquierda, presionar y soltar el
indicador para poder moverlo al ajustador de temperatura, abajo derecha. Girar
el indicador en el sentido de las agujas del reloj para aumentar el tiempo, en el
sentido contrario para disminuirlo. Una vez que el tiempo ha sido configurado,
presionar y soltar el indicador, “TEMPERATURA MANTENIDA” se resaltará.
Seguir el procedimiento de cambiar el tiempo de refrigeración para cambiar la
temperatura de mantenimiento.
Para terminara, presionar y mantener el indicador durante dos segundos para
volver a la pantalla de selección de programa, para continuar presionar y
soltar el indicador para comenzar el programa.
El tiempo de refrigeración y la refrigeración / mantenimiento de la
temperatura ajustada son retenidas por los programas profesional 1, 2 y 3 y
no vuelven por defecto.
Otras Funciones
7
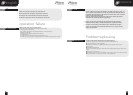
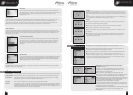
Ajuste del tiempo de enfriamiento ( Todos los programas excluídos el profesional 1, 2 y 3).
Cuando estemos en la pantalla de selección de pre-programado, presionar y mantener el indicador
durante dos segundos, entonces aparecerá la información en la pantalla, figura mostrada debajo
izquierda. Presionar y soltar el indicador para cambiar el tiempo, mostrado debajo derecha. Girar el
indicador en el sentido de las agujas del reloj para aumentar el tiempo, en el sentido contrario de
las agujas del reloj para disminuirlo. Una vez que el tiempo esté seleccionado, presionar y soltar el
indicador y “la temperatura de refrigeración” aumentará. Para terminar, presionar y mantener
pulsado el indicador durante dos segundos para volver al programa de selección, para continuar
presionar y soltar el indicador y así comenzará el programa.
Cuando se concluye el programa el tiempo cambiará a su valor de defecto.
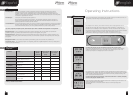
Display a)
Display b)
Display d)
Display c)