7
BEFORE SETTING OVEN CONTROLS
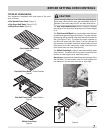
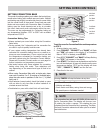
Your appliance is equipped with three types of the oven
rack, as shown;
(Figure 1).
(Figure 2 & 3).
(Figure 4).
The has an handle to facilitate
the sliding of the rack when large amount of foods weight
on it.
The has a removable insert that can
provide extra space for larger food items. The right half rack
portion may still be used for other food items like a casserole
dish (See Figure 3 & 4). To remove the insert, squeeze on
the left front insert side (See Figure 5) of the rack and tilt
out clockwise. To reinstall, insert rear hooks at back of insert
(See gure 6) and lay insert down. Make sure both insert
front hooks snap into rack (See gure 6).
The is used to maximize cooking space
(See Figure 4). The offset rack can be used in the lower rack
position to roast large cuts of meat and poultry.
Do not use cookware that extends beyond the edge of the
Flat Half Rack. For best results, allow 2 inches between the
pan placed on the rack and oven side or rear walls.
Figure 1
- Closed Position
Figure 2
- Open Position
Figure 3
Figure 5
Figure 6
Figure 4
CAUTION
Always use pot holders or oven mitts when adjusting the
oven racks. Wait until the oven has completely cooled if
possible. Oven racks may be HOT and may cause burns.


