


6
GB
Installing the hood
IMPORTANT
We recommend that two people carry
out the installation. Pay attention to the
procedure described in the assembly
instructions.
Preparation
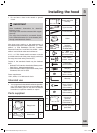
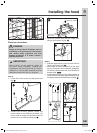
• Determinetheexactlocationoftherangehood.
• Plantherouteforventingexhausttotheoutdoors
(g.
)
.
• Planthepowerconnectionpriortoinstallationso
that electrical wiring will not be visible afterwards.
• House wiring location: The junction box is
located on the top right side of the hood. Wiring
should enter the back wall at least 20” above
the bottom of the installation height, and within
3-3/8” to 4-3/4” of the right side of the centerline
(g. /
)
.
fig.
• Use the shortest and straightest duct route
possible.
• The wall breakthrough must be carried
out by a professional prior to installing the
range hood. Pay attention to the length of
the exhaust hose when planning the wall
breakthrough. The exhaust hose must reach
the outer edge of the wall without any kinks.
Important! If the exhaust hose leads through an
outer wall, install a wall cap with damper or roof
cap at the exterior opening (not delivered). This
can be installed by the professional that performs
the wall breakthrough.
• Flexiblemetalroundductsshouldonlybeused
when no other duct tting exists. Limit use to
short lengths and do not crush when making
corners.
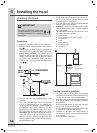
Examples of possible ducting or air
recirculation
Pipe
Collar
fig.
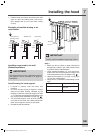
Installing range hood to the wall
(Exhaust operation)
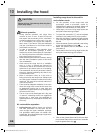
Install framing for hood support
• If drywall is present, mark the screw hole
locations.
• Cut away enough drywall to expose 2 vertical
studs at the holes location indicated by the
template. Install two horizontal supports at least
1” x 6” between two wall studs at the bottom and
topmountingholesinstallationlocation(g. ).
• The horizontal support must be ush with the
room side of the studs. Use cleats behind both
sides of the support to secure to wall studs.
• Reinstalldrywallandrenish.
• Ifopenreplacesareoperatedinthesameroom,
ask your local chimney sweeper about the local
regulations prior to installation.
• Ifyouarerenting,thenapprovalmustbeobtained
from the owner of the property.
• Attention! In order for the range hood to reach
optimal performance, install it over the middle of
the cooking area.
• Thefollowingaccessoriesarerequiredtomount
the range hood (not included):
Exhaust duct
Power drill with 3/16” and 1/8” bits
Screwdriver
Level
Cable detector
Measuring tape
Duct tape
fig.
Installation
height
8 to 9
ft
Center line
36”
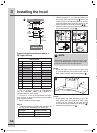
Ducting installation guidelines
• Forsafetyreasons,ductingshouldventdirectly
outdoors (not into an attic, underneath the house,
into the garage or into any enclosed space).
• Keepductrunsasshortandstraightaspossible.
• Ductttings(elbowsandtransitions)reduceair
owefciency.
• Backtobackelbowand“S”turnsgiveverypoor
delivery and are not recommended.
• Ashortstraightlengthofductattheinletofthe
remote blower gives the best delivery.
• Transition to duct from the integral blower or
remote duct transition as close to the downdraft
as is possible.
• Useasuitable6”roundduct.
Installing the hood
Installing the hood
00-Elux FHWC3060LSA-Range hood-Book-01.indd 6 12/8/10 12:43 PM