


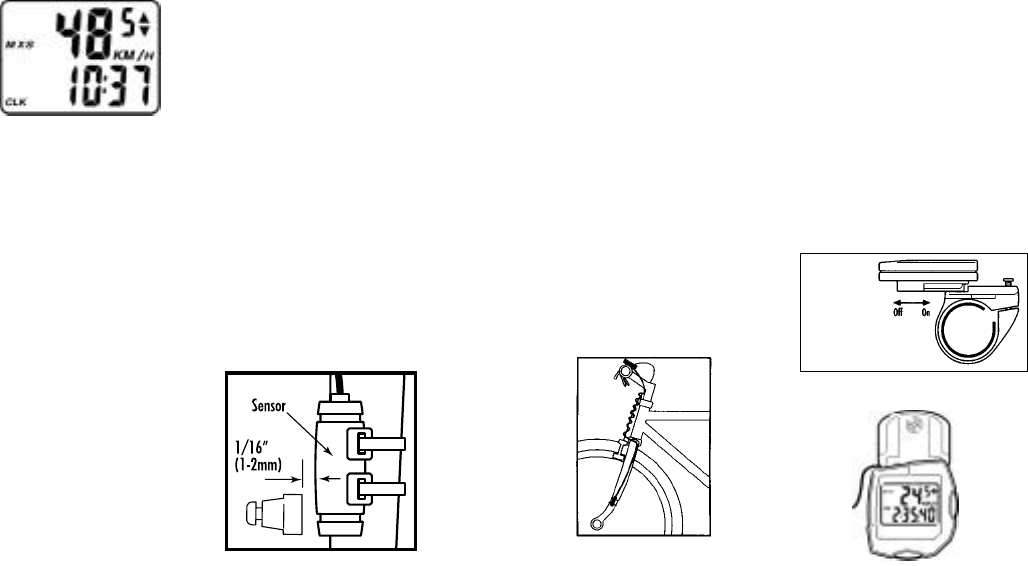
The Fisher Axiom Computer attaches to
the mounting bracket by sliding the unit
onto the bracket from the back until it
snaps firmly into position. To remove the
computer from the bracket, place your
thumb against the back of the mounting
bracket and pull the computer toward
you with your index finger.
4
5
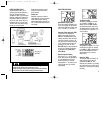
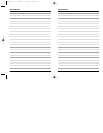
Maximum Speed (MXS)
The Maximum Speed reached during a
ride is displayed in 0.1 mi/Km incre-
ments on the top line, with the
MXS
icon. Maximum Speed is stored in
memory and is updated each time a
new, higher speed is reached.
CLOCK (CLK)
The 12 hour clock is displayed on the
lower line, indicated by the
CLK icon.
ATM “Lap Timer” Display
A unique
ATM “Lap Timer” display
allows you to lock the display at the end
of a ride segment and view the
ATM,
DST, AVS and MXS at a later time.
This is especially useful at the end of a
race, allowing you time to cool down
without adding time to your Stopwatch.
As you cross the finish line, press the left
key for over 1 second to freeze informa-
tion on the display. You may continue to
ride, viewing the information locked on
the flashing locked display. The computer
will continue to record information and
store it in memory. Press the left key to
update the current display information.
RESETTING THE COMPUTER
In SPD/ATM mode, press both keys for
over two seconds to clear
ATM, DST,
AVS and MXS display.
SLEEP MODE
To conserve battery power, the computer
will enter the ‘Sleep’ mode after 5 min-
utes of no speed input, blanking the dis-
play. Press any key to enter normal
operating modes.
(Note: Unit will not enter sleep mode in
setting function mode.)
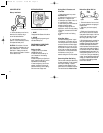
1. Position the axiom unit to the inside
of either the right of left fork blade
anywhere from 3-6 inches up from the
fork blade tip. Attach the axiom to the
fork blade with the quick ties but do not
tighten the ties completely until final
adjustment is complete.
INSTALLATION
Axiom and Wheel Magnet
2.
Attach the wheel magnet to a spoke,
aligning the magnet with the axiom so it
faces and intersects the bottom polished
line on the axiom. The magnet should
have 1-2 mm clearance from the axiom.
If the axiom and magnet are too close or
touching, rotate the axiom unit toward
the back of the fork blade until adequate
clearance is achieved. Carefully tighten
the quick ties making sure you maintain
the proper space between the magnet
and the axiom. Trim the excess quick tie
strap using a scissors or fingernail clip-
per. Tighten the magnet screw, but be
careful not to over tighten as this can
damage the fitting.
Axiom Wiring and Bracket
1. Route the axiom wire up the back of
the fork blade or wind the wire around
the blade, making sure that the wire is
not loose and that you leave enough
wire to reach the handlebar. Secure the
wire to the fork blade immediately
above the axiom and at the top of the
fork blade, using the adhesive strips
that are provided or electrical tape.
2. Wind the wire upward around the
front brake cable until the wire is adja-
cent to the handlebar, allowing enough
slack for free movement of the steering
assembly cables.
3. Attach the bracket to the handlebar
on either side of the stem. The bracket
goes onto the handlebar with the wire
toward the rider side of the bar. Use the
appropriate rubber shim between the
bracket and handlebar to provide a
secure fit.
Shims will
prevent slipping
Attaching the Computer to
the Bracket
01Axiom 98 6/12/00 10:48 AM Page 6