


About storage drawer and cover removal.
GEAppliances.com
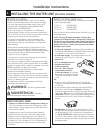
Not all features are on all models.
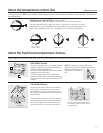
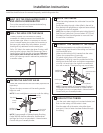
Twin Drawer Shelf
7RUHPRYH
1
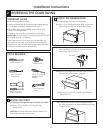
Remove the drawers.
2
Reach in, push the front of glass cover up,
and at the same time, pull it forward as far
as it will come.
Tilt it and take it out. Avoid cleaning the cold
JODVVFRYHUZLWKKRWZDWHUEHFDXVHWKH
H[WUHPHWHPSHUDWXUHGLȺHUHQFHPD\FDXVHLW
WREUHDN
3
5HPRYHWKHGUDZHUIUDPH$OZD\VUHPRYH
WKHJODVVFRYHUEHIRUH\RXWDNHRXWWKH
GUDZHUIUDPH
/LIWWKHIUDPHRȺWKHVXSSRUWVDWHDFKVLGH
DQGEDFNSXOOLWIRUZDUGWLOWLWDQGWDNHLWRXW
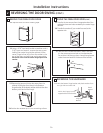
7RUHSODFH
1
Lower the frame until it rests on the
VXSSRUWVDWHDFKVLGHDQGEDFN
2
Replace the glass cover, pushing its rear
HGJH¿UPO\LQWRWKHUHDUIUDPHFKDQQHO
and gently lowering the front into place.
3
Replace the drawers.
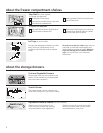
Drawer and Cover Removal
'UDZHUVFDQEHUHPRYHGHDVLO\E\JUDVSLQJ
the sides and lifting up slightly while pulling
drawers past the stop location.
7RUHPRYHWKHFRYHUOLIWLWRȺLWVVXSSRUWV
pull it forward, tilt it and take it out.
About the automatic icemaker.
$QHZO\LQVWDOOHGUHIULJHUDWRUPD\WDNHWRKRXUVWREHJLQPDNLQJLFH
Automatic Icemaker RQVRPHPRGHOV
7KHLFHPDNHUZLOOSURGXFHDSSUR[LPDWHO\
FXEHVLQDKRXUSHULRGGHSHQGLQJ
on the freezer compartment temperature, room
WHPSHUDWXUHQXPEHURIGRRURSHQLQJVDQGRWKHU
use conditions.
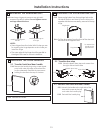
,IWKHUHIULJHUDWRULVRSHUDWHGEHIRUHWKHZDWHU
connection is made to the icemaker, set the switch
to OFF or move the feeler arm to the STOPXS
position.
:KHQWKHUHIULJHUDWRUKDVEHHQFRQQHFWHG
to the water supply, set the switch to the ON
position or move the feeler arm to the ON
GRZQSRVLWLRQ
7KHLFHPDNHUZLOO¿OOZLWKZDWHUZKHQLWFRROVWR
15°F. A newly-installed refrigerator may take 12 to
KRXUVWREHJLQPDNLQJLFHFXEHV
Once the icemaker starts to make ice, it may
WDNHXSWRKRXUVWR¿OOWKHELQGHSHQGLQJRQ
WKHWHPSHUDWXUHVHWWLQJVDQGQXPEHURIGRRU
openings.
<RXZLOOKHDUDEX]]LQJVRXQGHDFKWLPHWKH
LFHPDNHU¿OOVZLWKZDWHU
7KURZDZD\WKH¿UVWIHZEDWFKHVRILFHWRDOORZ
the water line to clear.
Be sure nothing interferes with the sweep of the
feeler arm.
:KHQWKHELQ¿OOVWRWKHOHYHORIWKHIHHOHUDUP
the icemaker will stop producing ice.
,WLVQRUPDOIRUVHYHUDOFXEHVWREHMRLQHG
together.
,ILFHLVQRWXVHGIUHTXHQWO\ROGLFHFXEHVZLOO
EHFRPHFORXG\WDVWHVWDOHVKULQNRUIXVH
together.
Icemaker Accessory Kit
If your refrigerator did not already come equipped
with an automatic icemaker, an icemaker
DFFHVVRU\NLWLVDYDLODEOHDWH[WUDFRVW
&KHFNWKHEDFNRIWKHUHIULJHUDWRUIRU
WKHVSHFL¿FLFHPDNHUNLWQHHGHGIRU
your model.
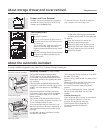
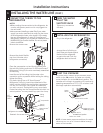
Feeler Arm
in the STOP
XSSRVLWLRQ
Feeler Arm in
the ONGRZQ
position
7
7KHUHDUHW\SHVRILFHPDNHUV
Power switch model
Feeler arm model
ON
OFF
Ice maker
Feeler Arm
Power Switch