


20"
Min.
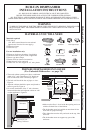
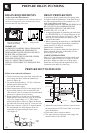
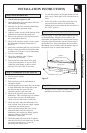
PREPARE DRAIN PLUMBING
DRAIN REQUIREMENTS
¥ Follow local codes and ordinances.
¥ If dishwasher is not adjacent to sink, horizontal drain line
should not be longer than 10 feet and should not contain
more than three 90¡ long radius turns.
IMPORTANT
TO PREVENT POSSIBLE DRAIN FROM SINK
INTO DISHWASHER OR SIPHONING OF
DISHWASHER WATER, DRAIN LINE MUST
BE ROUTED AS FOLLOWS:
MIN. 30" ABOVE THE FLOOR FOR UNDER
THE SINK CONNECTION.
MIN. 20" ABOVE THE FLOOR FOR
INSTALLATION DIRECTLY THROUGH THE
FLOOR.
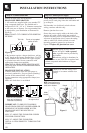
Copper
Tubing
Nut
Compression
Ring
Valve
Elbow
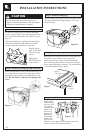
PREPARE HOT WATER LINE
Follow local codes and ordinances.
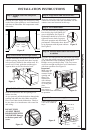
1. The hot water line may enter from either side, the
rear or from the floor within the shaded area
shown in Figure D.
2. Cut a hole approximately 1-1/2Ó dia. within the
shaded area to admit the line.
3. Turn off the water supply.
4. Install a hand shut-off valve in the supply line in
an accessible location, such as under the sink.
(The shut-off valve is optional, but recommended
and may be required by local codes.)
5. Water connection is on left side of dishwasher.
Install the hot water inlet line, using no less than
3/8Ó O.D. copper tubing or 1/2Ó O.D. plastic
tubing. Route line as shown in Figure D. Extend
the water line forward at least 19Ó from rear wall.
6. The water valve has a 3/8 N.P.T. internal thread.
We recommend use of 90 degrees elbow for
connection of copper tubing to water valve.
(See Figure E)
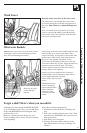
DRAIN PREPARATION
A drain hose already connected to the pump outlet
is supplied with the dishwasher. If the drain hose is
not long enough and has to be extended, use a 1/2"
O.D. copper tubing with clamp.
THE RUBBER END OF THE DRAIN HOSE MAY
BE CUT OFF TO ACCOMMODATE THE
FOLLOWING SIZES OF TAIL PIECE OR
WASTE TEE: 5/8", 3/4" OR 1"
1. A suggested method of connecting the drain hose
to a WASTE TEE or a Y branch tailpiece on the
existing sink trap is shown in Figure C. They are
made by several manufacturers purposely for
electric dishwashers.
2. When connecting the drain hose to a DISPOSER,
remove hopper plug before making connection.
Install waste tee or disposer according to
manufacturerÕs instructions.
Note: be sure to remove drain plug from disposer
before attaching drain line. dishwasher will not
drain if plug is left in place.
CABINET PREPARATION
Drill 1-1/2Ó inch diameter hole in the cabinet wall
within the shaded area shown in Figure A for the
drain hose. Make sure there are no sharp edges.
Drain hose will be passed through this hole and
connected to the drain in a later step.
7. Adjust the water heater to deliver water between
the temperatures of 120¡F and 150¡F as it comes
in the dishwasher.
8. Flush water line to clean out debris.
9. The water pressure of the hot water supply line
must be between 20-120 PSI.
6"
5"
1-1/2" Dia.
Hole
5"
4"
4"
19" from Wall
2" from Floor
Cabinet Face
2"
from
Cabinet
Hot
Shut-off
Valve
Figure D
Under the sink connection
Hose may be fastened to
underside of countertop
Installation directly
through the floor
16
o
countertop
32"
Min.
18"
Min.
Fig. C