


IMPORTANT: Make sure the dispenser is unplugged with
both the hot and cold power switches (on the back of the
dispenser) set to the O (off) position. Before placing the
water bottle on the dispenser, wash hands and wipe the
top of the bottle with a clean cloth. Avoid touching the
part of the bottle that will be in contact with the water
dispenser.
Make sure the water level in the top of the dispenser is
low enough to allow for proper bottle installation. Failure
to do so may cause the dispenser to overflow.
Sanitize the dispenser water tanks prior to installing a
full bottle of water for the first time (see “Cleaning and
Sanitizing the Water Tanks”).
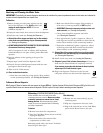
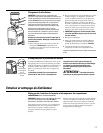
1. Peel the label from the top cover of the bottle.
Do not remove the entire bottle cap or press in
the center plug.
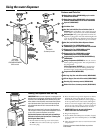
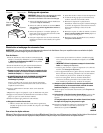
2. Place the bottle on top of the dispenser as shown,
aligning the center plug with the probe. Press
down until the probe pushes the center plug out
of the cap and into the water bottle, allowing the
bottle to rest on the support collar. The plug may
remain on top of the probe or may be released to
float in the water; both conditions are normal.
3. IMPORTANT: Press the hot and cold dispenser
buttons until water runs from both taps.
4. Plug in the dispenser.
5. Set the HOT and COLD power switches (located
on the top left rear of the dispenser) to the I (on)
position.
6. Allow 30 minutes for water to reach hot and cold
temperatures.
Contact a local water bottle distributor to purchase
water bottles.
Loading the Dispenser and Start Up
4
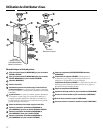
Using the water dispenser.
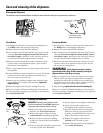
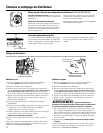
Features and Parts List
Bottle Support Collar (WS28X10038), grey for models
GXCF05D and GXCC01D
Bottle Support Collar (WS28X10036), white for model
GXCF20E, (WS28X10035) black for model GXCF20FBB
Separator (WS28X10013)
Cold Water Tank
Hot (Red) and Cold (Blue) Power Switches (back of
dispenser). The Cold (Blue) power switch also turns
on the chiller compartment (on model GXCF20E).
Indicator Lights. The green light will be lit when the
dispenser is plugged in. The red and blue lights will
cycle on and off while the dispenser heats and cools
water. Compressor start delayed by up to 3 minutes.
Hot (Red) and Cold (Blue) Water Dispenser Buttons
Dispenser Drip Tray (WS28X10016) and Grille
(WS28X10015), grey for models GXCF05D and GXCC01D
Dispenser Drip Tray (WS28X10026) and Grille
(SW28X10027) white for model GXCF20E
Dispenser Drip Tray (WS28X10031) and Grille
(WS28X10034) black for model GXCF20FBB
Compartment Tray (model GXCF20E/GXCF20FBB only)
(WS29X10029)
Storage Compartment (GXCF05D). Do not use to store
foods requiring refrigeration. The compartment is
not refrigerated.
Chiller Compartment (GXCF20E). The compartment
is intended solely for use in chilling canned and
boxed beverages, and packaged nonperishables.
Compartment Shelf (WS28X10028)
Drainage Cap (floor and chiller models) (WS01X10008)
Silicon Stopper (floor and chiller models) (WS01X10007)
Retaining Clip (countertop models) (WS01X10010)
Rubber Drain Cover (countertop models) (WS01X10011)
GXCF05D
Floor model
GXCF20E/GXCF20FBB
Chiller model
GXCC01D
Countertop model