24
Consumer Support Troubleshooting Tips Care and Cleaning Operating Instructions Safety Instructions
Care and cleaning of the range.
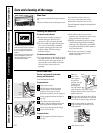
The gasket is designed with a gap at the
bottom to allow for proper air circulation.
Do not rub or clean the door gasket—
it has an extremely low resistance to
abrasion.
If you notice the gasket becoming worn,
frayed or damaged in any way or if it
has become displaced on the door,
you should have it replaced.
To clean the inside of the door:
■ Because the area inside the gasket is
cleaned during the self-clean cycle,
you do not need to clean this by hand.
■ The area outside the gasket and the door
liner can be cleaned with a soap-filled
or plastic scouring pad, hot water and
detergent. Rinse well with a vinegar
and water solution.
To clean the outside of the door:
■ Use soap and water to thoroughly clean the
top, sides and front of the oven door. Rinse
well. You may also use a glass cleaner to
clean the glass on the outside of the door.
Do not let water drip into the vent
openings.
■ If any stain on the door vent trim is
persistent, use a soft abrasive cleaner and a
sponge-scrubber for best results.
■ Spillage of marinades, fruit juices, tomato
sauces and basting materials containing
acids may cause discoloration and should
be wiped up immediately. When surface is
cool, clean and rinse.
■ Do not use oven cleaners, cleaning
powders or harsh abrasives on the
outside of the door.
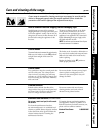
Lift-Off Oven Door
Cleaning the Oven Door
The door is very heavy. Be careful when
removing and lifting the door.
Do not lift the door by the handle.
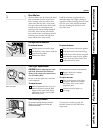
To remove the door:
Fully open the door.
Pull the hinge locks down toward
the door frame, to the unlocked
position. A tool, such as a small
flat-blade screwdriver, may be required.
Firmly grasp both sides of the door at
the top.
Close door to the door removal
position, which is halfway between the
broil stop position and fully closed.
Lift door up and out until the hinge
arm is clear of the slot.
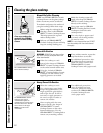
To replace the door:
Firmly grasp both sides of the door at
the top.
With the
door at the
same angle as
the removal
position, seat the
indentation of
the hinge arm
into the bottom edge
of the hinge slot. The notch in the
hinge arm must be fully seated into the
bottom of the slot.
Fully open the door. If the door will not
fully open, the indentation is not seated
correctly in the bottom edge of the slot.
Push the hinge locks up against the
front frame of the oven cavity to the
locked position.
Close the oven door.
Hinge
lock
Removal position
Indentation
Bottom
edge of
slot
Hinge
lock
Slot
Push hinge locks up to lock.
Pull hinge locks down to unlock.
Hinge arm
Hinge
arm
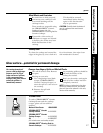
Oven Vent
The oven vent is located behind the right rear surface
unit.
This area could become hot during oven use.
It is normal for steam to come out
of the vent, and moisture may collect
underneath it when the oven is in use.
The vent is important for proper air circulation. Never
block this vent.


