


11
Safety Instructions Operating InstructionsSafety Instructions Operating Instructions Care and Cleaning Troubleshooting Tips Customer Service
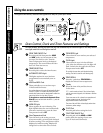
Using the clock and timer.
Not all features are on all models.
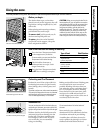
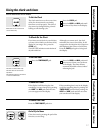
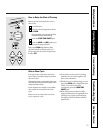
To Set the Clock
The clock must be set to the correct time
of day for the automatic oven timing
functions to work properly. The time of
day cannot be changed during a timed
baking or self-cleaning cycle.
Press the
CLOCK
pad.
Press the
HOUR
and
MIN.
pads until
the time of day shows in the display.
Make sure the clock is set to the
correct time of day.
To Set the Timer
Press the
TIMER ON/OFF
pad. Press the
HOUR
and
MIN.
pads until
the amount of time you want shows
in the display. The timer will start
automatically within a few seconds of
releasing the pad.
The timer is a minute timer only.
The timer does not control oven
operations.
The maximum setting on the timer is
11 hours and 59 minutes.
End of Cycle Tones
Clear the tones by pressing the pad of the
function you are using.
or
To Reset the Timer
If the display is still showing the time
remaining, you may change it by pressing
the
HOUR
and
MIN.
pads until the time
you want appears in the display.
If the remaining time is not in the display,
recall the remaining time by pressing the
TIMER ON/OFF
pad and then pressing the
HOUR
and
MIN.
pads until the new time
you want shows in the display.
To Cancel the Timer
Press the
TIMER ON/OFF
pad twice.
To Black-Out the Clock
If you have several clocks in your kitchen,
you may wish to black-out the time of day
display of your range. If so, press the
CLOCK
pad.
Press the CLOCK pad twice to retain the time of
day after a black-out.
Although you cannot see it, the clock
maintains the correct time of day. It will
reappear for the duration of any function
that displays a Start Time or Cook Time.
Press the
CLOCK
pad again to bring back
the display.