


13
2
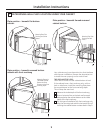
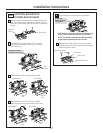
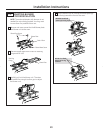
Rotate front of oven
up against cabinet
bottom.
1
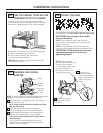
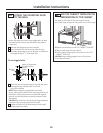
MOUNT THE OVEN
A4.
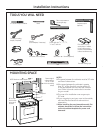
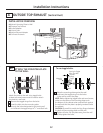
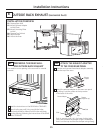
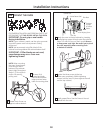
ASSEMBLE AND INSTALL
ADAPTER
A3.
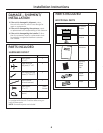
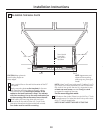
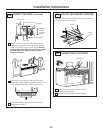
USE TOP CABINET TEMPLATE FOR
PREPARATION OF TOP CABINET
You need to drill holes for the top support screws,
a hole large enough for the power cord to fit through,
and a cutout large enough for the exhaust adapter.
A2.
FOR EASIER INSTALLATION AND PERSONAL SAFETY, WE
RECOMMEND THAT TWO PEOPLE INSTALL THIS OVEN.
IMPORTANT: Do not grip or use handle
during installation.
NOTE: If your cabinet is metal, use the nylon
grommet around the power cord hole to prevent
cutting of the cord.
NOTE: We recommend using filler blocks if the
cabinet front hangs below the cabinet bottom shelf.
IMPORTANT: If filler blocks are not used,
case damage may occur from over
tightening screws.
NOTE: When mounting
the oven, thread power cord
through hole in bottom
of top cabinet. Keep it tight
throughout Steps 1–3.
Do not pinch cord or lift
oven by pulling cord.
Lift oven, tilt it
forward and hook
slots at back bottom
edge onto two lower
tabs of mounting
plate.
Damper
Back of
Oven
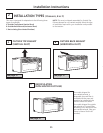
• Read the instructions on the top cabinet template.
• Tape it underneath the top cabinet.
• Drill the holes, following the instructions
on the top cabinet template.
CAUTION: Wear safety goggles when drilling holes
in the cabinet bottom.
Installation Instructions
Place the oven in its upright position, with the top
of the unit facing up.
NOTE: Make sure the blower fan blades are visible
and are pointing up.
Insert the tabs on each side of the damper
into the holes at the inside rear of the adapter.
Attach the exhaust adapter to the blower plate
with the two bronze metal screws provided.
Make sure that the damper pivots easily before
mounting oven.
You will need to make adjustments to assure
proper alignment with your house exhaust duct
after the oven is installed.
Exhaust
Adapter
1
2
Blower Plate
3
NOTE: On some models, the exhaust adapter and damper
assembly may already be assembled to the oven.