


10
Delay Timed Cooking (Continued)
To begin cooking immediately and turn off at the desired
time:
Position oven rack(s) at the proper height(s).1.
Place the food onto the center of the oven rack(s).2.
Select the desired cooking mode and temperature.3.
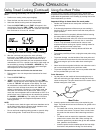
Press the 4. COOK TIME key and “TIME” will appear in the
clock display. Press the TIME • TEMP + key to set the length
of time that the food will be cooked. The cook time can be set
from 5 minutes to 11 hours, 50 minutes.
After the cook time has expired, the clock will beep 5.
three times, and “Hold” will be displayed. If cooking in a
convection mode, the convection fan will also turn off at
this time. While in hold mode, the oven temperature will be
maintainedat150˚Fforaperiodoftwohours.Holdmodecan
be cancelled by pressing the CANCEL • SECURE key. The
cooling fan will continue to run depending upon the length
and temperature of the cooking process.
To start at a later time and finish at the desired time:
Follow steps 1 thru 4 in the previous instructions for timed 1.
cooking.
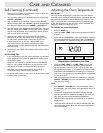
Press the 2. STOP TIME key.
“STOP”3. will appear in the clock display. Press the TIME •
TEMP + key to enter the time of day that you wish the oven
to shut off. “DELAY” will appear on the display. The oven
will calculate the correct start time. After the cook time has
expired, the clock will beep three times, and “Hold” will
appear on the display. If cooking in a convection mode, the
convection fan will also turn off at this time. While in hold
mode,theoventemperaturewillbemaintainedat150˚Ffora
period of two hours. Hold mode can be cancelled by pressing
the CANCEL • SECURE key. The cooling fan will continue
to run depending upon the length and temperature of the
cooking process.
NOTE:
For double ovens, both the upper and lower chambers can be •
set for delay timed cooking. However, both chambers must
have the same cook times and stop times.
Do not use foods containing baking powder or yeast in delay •
timed cooking mode. These foods will not rise properly.
Using the Meat Probe
For many foods, especially roasts and poultry, internal food
temperature is the best test for properly cooked food. The meat
probe takes the guesswork out of roasting by cooking food to the
exact temperature you desire.
Important things to know about the meat probe:
Double oven models have a meat probe connector in the •
upper oven only.
If the internal temperature of the meat you are cooking is •
lessthan55˚F,youneedtowaittoinsertthemeatprobefor
proper operation.
Make sure the food is completely defrosted before inserting •
the meat probe to avoid breaking the probe.
For fully defrosted meat• : allow it to come to room temperature
by leaving it out for at least 15 minutes, but no more than
2 hours. Fully defrosted meat allowed to come to room
temperature before cooking can improve cooking results for
searing, roasting and meat cooked rare.
For partially frozen meat• : first fully defrost and follow the
steps above.
To avoid the possibility of burns, unplug the meat probe using •
hot pads.
To prevent damage, use the handles of the meat probe and •
plug to insert and remove them from the food and connector.
Do not use tongs to pull on the cable when removing the
probe.
Never leave the meat probe inside the oven when the oven is •
not in use and especially during self-clean mode.
To prevent damage to the oven, do not use probes other than •
the one provided with your wall oven.
Probe Placement:
Lay the probe on the outside of the meat along the top or 1.
side and mark with your finger where the edge of the meat
comes to the probe. The point should rest in the center of the
thickest meaty part of the roast.
Insert the probe into the meat to the point marked by your 2.
finger. The probe should not touch the bone, fat, gristle or the
bottom of the pan.
For roasts with no bone, insert the probe into the side of •
the roast in the center. For bone-in ham or lamb, insert
the probe into the center of the lowest large muscle or
joint.
For dishes such as meat loaf or casseroles, insert the •
probe into the center of the dish. When cooking fish,
insert the probe from just above the gill into the meatiest
area, parallel to the backbone.
Insert the probe into the meatiest part of the inner thigh •
from below, and parallel to the leg of a whole turkey.
ov e n op e r a t I o n
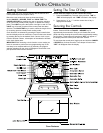
Setting the Oven for Delay Timed Cooking
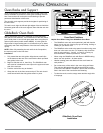
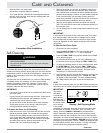
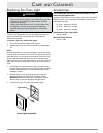
Plug
Cable
Handles
Probe
Meat Probe