


– 13 –
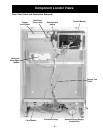
Dishwasher Components
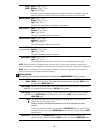
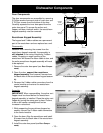
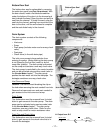
Door Components
The door components are accessible by removing
3 Phillips screws from each side of inner door and
2 T20 torx screws from the bottom of the door.
Carefully separate the inner door panel from the
outer door panel. To access the active vent,
flapper, and door interlock switch, the escutcheon
keypad assembly must be removed.
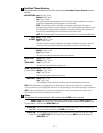
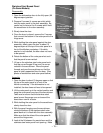
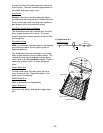
Escutcheon Keypad Assembly
The keypad and 2 ribbon cables are a permanent
part of the escutcheon and are replaced as a unit.
Disassembly
Caution: After removing the screws from the
escutcheon keypad assembly, the assembly is
still attached to the control module by 2 ribbon
cables. Dropping or rough handling of the
escutcheon will cause the ribbon cable to tear, and
the entire escutcheon keypad assembly will need
to be replaced.
1. Remove the outer door panel
(see
Door Compo-
nents
).
2. Open the door, support the escutcheon
keypad assembly, and remove 6 screws from
the back side of the escutcheon keypad assem-
bly.
3. Remove the 2 ribbon cable connectors from the
control module and remove the escutcheon
keypad assembly.
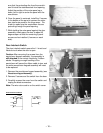
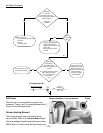
Assembly
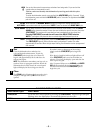
IMPORTANT: When reassembling, the active vent
flapper must be closed before the escutcheon
keypad assembly is installed. Close the active vent
flapper by turning the worm gear by hand. Failure
to do so will cause a misalignment and an
increase in noise level.
1. While supporting the escutcheon keypad as-
sembly, connect the 2 ribbon cable connectors
to the control module.
2. Open the door. Align the escutcheon and install
6 screws from the back side of the escutcheon
keypad assembly.
3. Install the outer door panel
(see
Door Compo-
nents
).
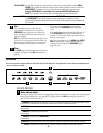
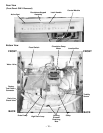
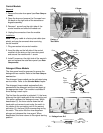
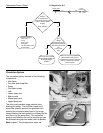
Harness
Detergent
Module
Interlock
Switch
Assembly
Electronic
Control
Active Vent
Flapper
Figure 5
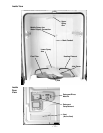
Control Module
Escutcheon Keypad Assembly
Active Vent
Worm Gear
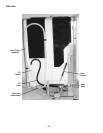
Active Vent
Worm Gear