


27
Installation Instructions
INSTALLING THE REFRIGERATOR (cont.)
Refer to 239D4144P001, Pub No. 31-45474-2
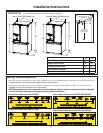
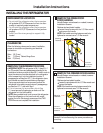
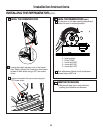
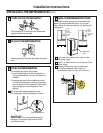
IMPORTANT!
The 6 mounting screws (3 on each side) are NOT interchangeable with the center or top hinge
screws. Drawer screws have flat washer heads, and other screws have lines/ribs on washer heads.
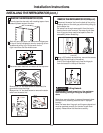
After installation of the freezer door, check for uniform gaps (top and bottom of right and left hand
side) with the template provided.
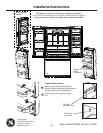
In the event of excessive gaps use the following steps to adjust the freezer door.
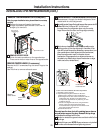
Step 1 - Loosen the 3 screws on each side (right and left) of the freezer door.
Step 2 - Adjust set screw clockwise if gap at the top is too big (see template). Turn the set screw using 3/32” hex
key clockwise by quarter to half a rotation
Step 3 - Adjust set screw counter-clockwise if gap at the bottom is too big (see template). Turn the set screw
using 3/32” hex key counter-clockwise by quarter to half a rotation
Step 4 - Tighten the 3 screws on each side (right and left).
Step 5 - Re-check the gaps using the template and repeat steps 1 to 4 if required and complete with step 5.
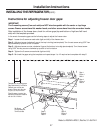
Instructions for adjusting freezer door gaps:
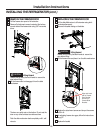
Fold here for using template
0.600”
Template for checking gaps.
Gap should be 0.6” or below.
Gabarit pour vérifier les
écarts. L’écart doit être de
0,6 po (1,5 cm) ou moins.
Plantilla para el control de
espacios. El espacio debería
ser de 0.6” o inferior.
Step 1
Étape 1
Paso 1
Step 4
Étape 4
Paso 4
Set Screw
Vis d’ajustement
Tornillo del Set
Step 3
Étape 3
Paso 3
Step 2
Étape 2
Paso 2
Plier ici pour utiliser le gabarit Dóblelo aquí para usar la plantilla