


2
Consumer Information
Trivection
™
Wall Oven
Introduction
Your new Monogram wall oven makes an eloquent statement of style, convenience and kitchen
planning flexibility. Whether you chose it for its purity of design, assiduous attention to detail—
or for both of these reasons—you’ll find that your Monogram wall oven’s superior blend of form
and function will delight you for years to come.
Your Monogram wall oven was designed to provide the flexibility to blend in with your kitchen
cabinetry. Its sleek design can be beautifully integrated into the kitchen.
The information on the following pages will help you operate and maintain your wall oven
properly.
Contents
Care and Cleaning
Broiler Pan and Grid . . . . . . . . . . . . . . . . . . 39
Cleaning Oven Door . . . . . . . . . . . . . . . . . . .38
Control Panel . . . . . . . . . . . . . . . . . . . . . . . .39
Light Bulb . . . . . . . . . . . . . . . . . . . . . . . . . . 37
Packaging Tape . . . . . . . . . . . . . . . . . . . . . 2, 37
Racks . . . . . . . . . . . . . . . . . . . . . . . . . . . . . . . 39
Stainless Steel Surfaces . . . . . . . . . . . . . . . . .38
Consumer Services
Before You Call For Service . . . . . . . . . . 40–42
Important Phone Numbers . . . . . . . . . . . . . 47
Model and Serial Numbers . . . . . . . . . . . . . . . 3
Product Registration . . . . . . . . . . . . . . 3, 45–46
Safety Instructions . . . . . . . . . . . . . . . . . . . . 4–7
Warranty . . . . . . . . . . . . . . . . . . . . . Back Cover
Oven
Adjusting Temperature . . . . . . . . . . . . . . . . . 34
Clock, Timer and Control Lockout . . . . . . . 12
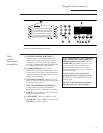
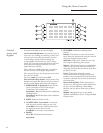
Controls . . . . . . . . . . . . . . . . . . . . . . . . . . .9–11
Convection . . . . . . . . . . . . . . . . . . . . . . .24–27
Defrost Feature, Guide . . . . . . . . . . . . . .19, 20
Introduction . . . . . . . . . . . . . . . . . . . . . . . . . .8
Oven . . . . . . . . . . . . . . . . . . . . . . . . . . . . .13–15
Proof, Warmer and Warm . . . . . . . . . . . . . . .29
Recipes . . . . . . . . . . . . . . . . . . . . . . . . . . . . . 28
Sabbath Feature . . . . . . . . . . . . . . . . . . . .35, 36
Self-Cleaning Oven . . . . . . . . . . . . . . . . . 30, 31
Settings . . . . . . . . . . . . . . . . . . . . . . . . . . 32, 33
Speed Baking/Speed Roasting . . . . . . . .16, 17
Speed Broiling, Guide . . . . . . . . . . . . . . .17, 18
Timed Baking & Roasting . . . . . . . . .22, 26, 27
Traditional Baking/Roasting . . . . . . . . . .21, 22
Traditional Broiling, Guide . . . . . . . . . . . . . .23
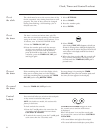
How to
remove
protective
shipping film
and
packaging
tape
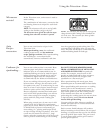
Carefully grasp a corner of the protective shipping
film with your fingers and slowly peel it from the
appliance surface. Do not use any sharp items to
remove the film. Remove all of the film before
using the appliance for the first time.
To assure no damage is done to the finish of
the product, the safest way to remove the adhesive
from packaging tape on new appliances is an
application of a household liquid dishwashing
detergent. Apply with a soft cloth and allow
to soak.
NOTE: The adhesive must be removed from all parts.
It cannot be removed if it is baked on.